# YOLOV5检测器
YOLOV5模型是目前工业界使用较多的算法,官方提供了多个不同版本的预训练模型,本份文档主要介绍了如何基于migraphx构建YOLOV5动态shape推理,该示例推理流程对YOLOV5其他版本的模型同样适用。
## 模型简介
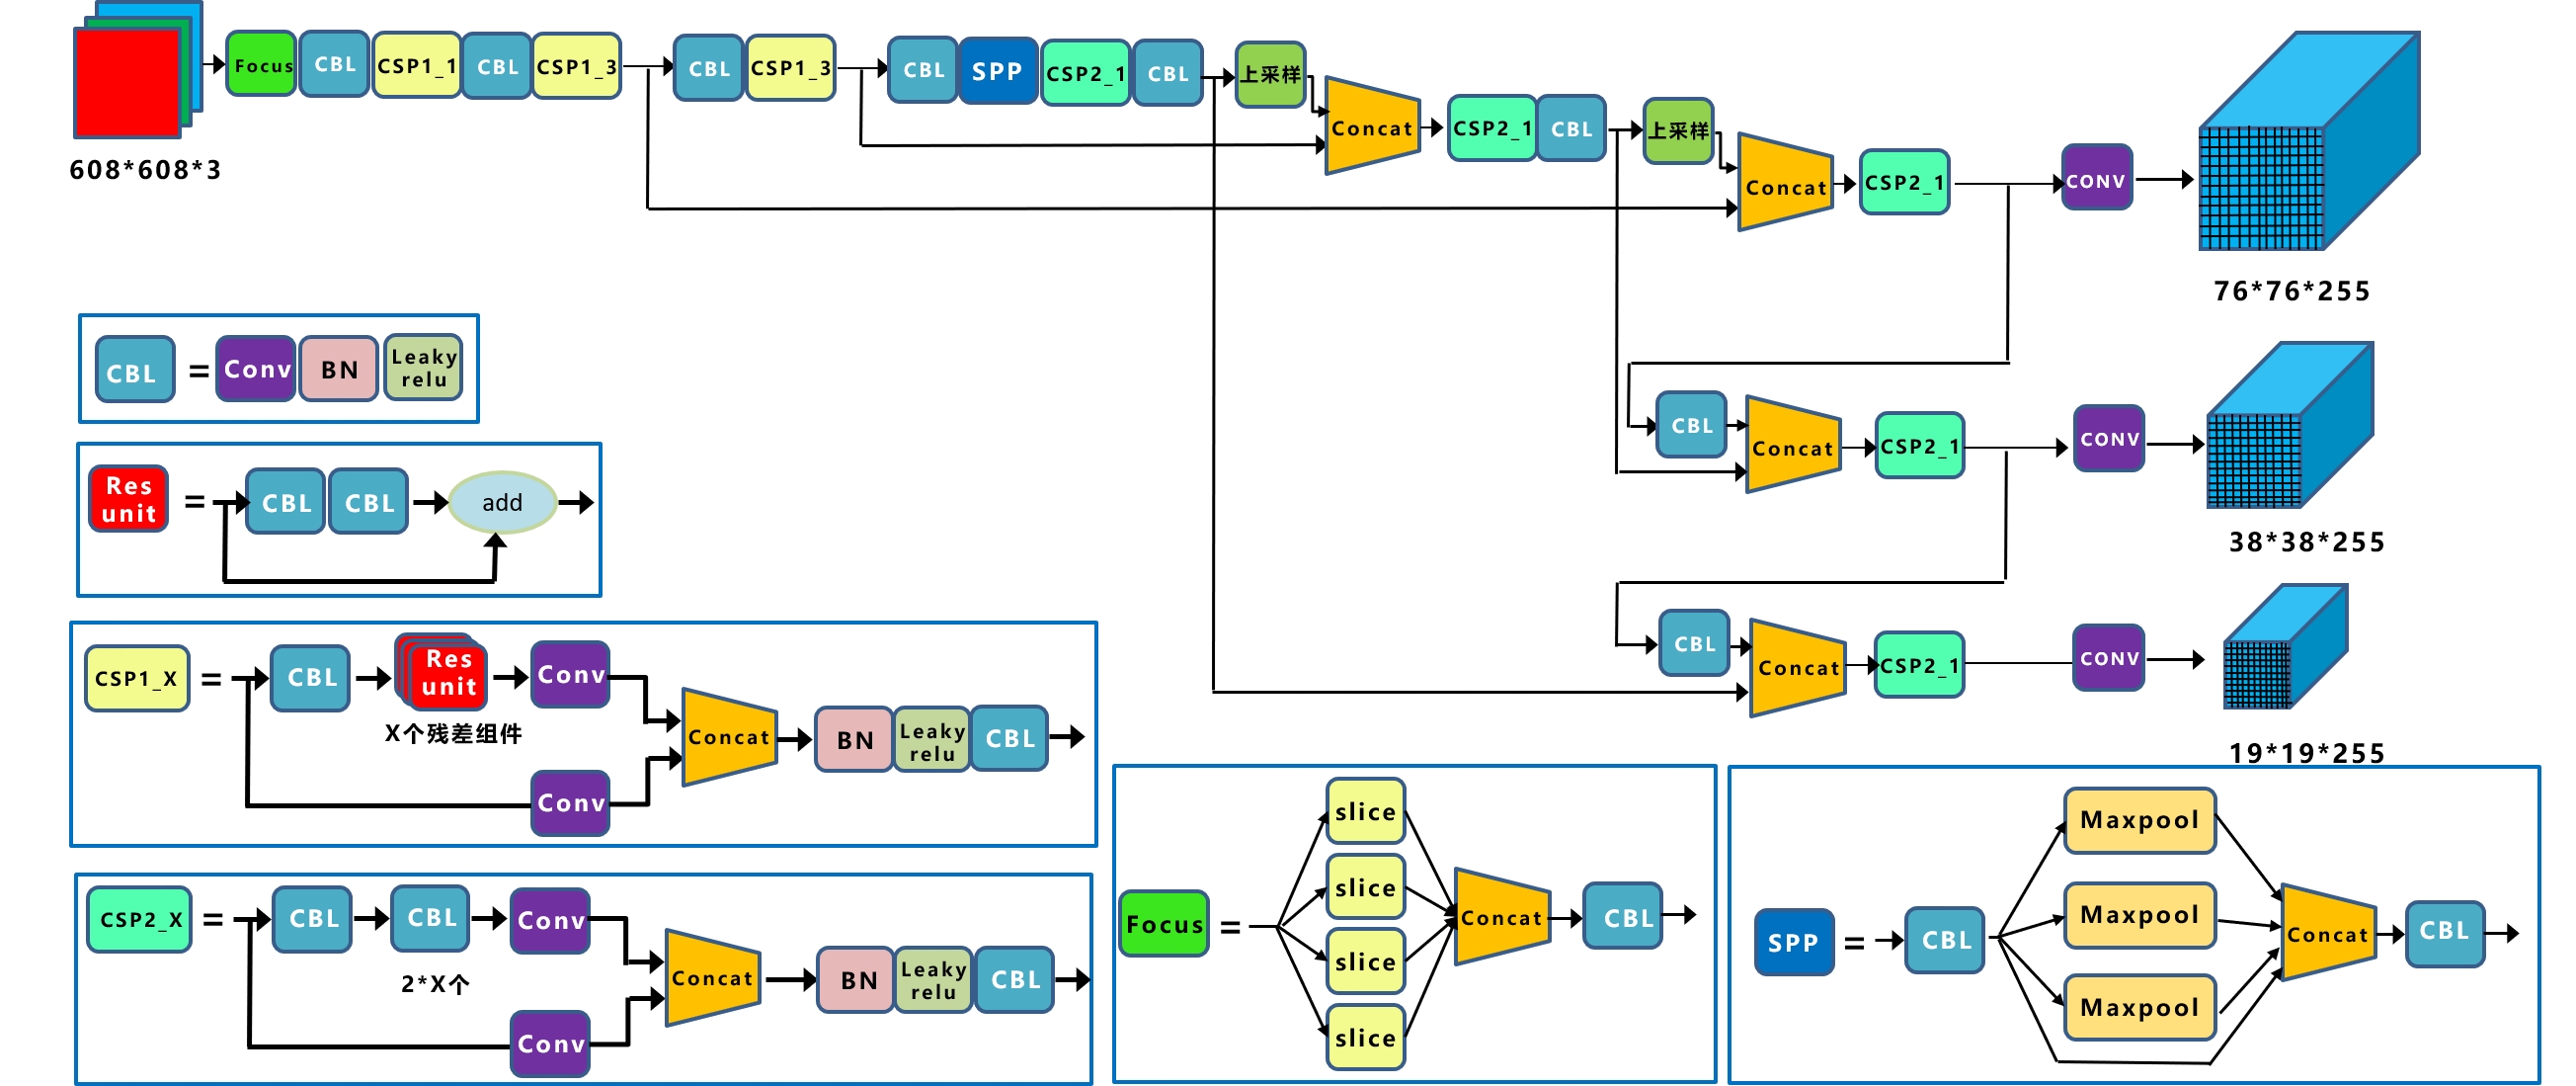
YOLOV5是一种单阶段目标检测算法,该算法在YOLOV4的基础上添加了一些新的改进思路,使其速度与精度都得到了极大的性能提升。具体包括:输入端的Mosaic数据增强、自适应锚框计算、自适应图片缩放操作;主干网络的Focus结构与CSP结构;Neck端的FPN+PAN结构;输出端的损失函数GIOU_Loss以及预测框筛选的DIOU_nms。网络结构如图所示。
 ## 检测器参数设置
samples工程中的Resource/Configuration.xml文件的DetectorYOLOV5节点表示YOLOV5检测器的参数,相关参数主要依据官方推理示例进行设置。各个参数含义如下:
- ModelPath:yolov5模型存放路径
- ClassNameFile:coco数据集类别文件存放路径
- UseFP16:是否使用FP16推理模式
- NumberOfClasses:检测类别数量
- ConfidenceThreshold:置信度阈值,用于判断anchor内的物体是否为正样本
- NMSThreshold:非极大值抑制阈值,用于消除重复框
- ObjectThreshold:用于判断anchor内部是否有物体
```
"../Resource/Models/yolov5s_Nx3xNxN.onnx"
"../Resource/Models/coco.names"
0
80
0.25
0.5
0.5
```
## 模型初始化
模型初始化首先通过parse_onnx()函数加载YOLOV5的onnx模型,本示例构建YOLOV5动态shape推理,所以需要设置模型输入的最大shape,本示例设为{1,3,800,800},并可以通过program的get_parameter_shapes()函数获取网络的输入属性。完成模型加载之后需要使用compile()方法编译模型,编译模式使用migraphx::gpu::target{}设为GPU模式,编译过程主要基于MIGraphX IR完成各种优化。同时如果需要使用低精度量化进行推理,可以使用quantize_fp16()函数实现。
```
ErrorCode DetectorYOLOV5::Initialize(InitializationParameterOfDetector initializationParameterOfDetector)
{
...
migraphx::onnx_options onnx_options;
onnx_options.map_input_dims["images"]={1,3,800,800};
net = migraphx::parse_onnx(modelPath, onnx_options);
LOG_INFO(stdout,"succeed to load model: %s\n",GetFileName(modelPath).c_str());
// 获取模型输入属性
std::unordered_map inputMap=net.get_parameter_shapes();
inputName=inputMap.begin()->first;
inputShape=inputMap.begin()->second;
int N=inputShape.lens()[0];
int C=inputShape.lens()[1];
int H=inputShape.lens()[2];
int W=inputShape.lens()[3];
inputSize=cv::Size(W,H);
// 设置模型为GPU模式
migraphx::target gpuTarget = migraphx::gpu::target{};
// 量化
if(useFP16)
{
migraphx::quantize_fp16(net);
}
// 编译模型
migraphx::compile_options options;
options.device_id=0;
options.offload_copy=true;
net.compile(gpuTarget,options);
LOG_INFO(stdout,"succeed to compile model: %s\n",GetFileName(modelPath).c_str());
...
}
```
## 预处理
在将数据输入到模型之前,需要对图像做如下预处理操作:
1. 转换数据排布为NCHW
2. 归一化[0.0, 1.0]
3. 将输入数据的尺寸变换到YOLOV5动态输入大小,relInputShape为每次实际inputshape
```
ErrorCode DetectorYOLOV5::Detect(const cv::Mat &srcImage, std::vector &relInputShape, std::vector &resultsOfDetection)
{
...
inputSize = cv::Size(relInputShape[3], relInputShape[2]);
// 预处理并转换为NCHW
cv::Mat inputBlob;
blobFromImage(srcImage, // 输入数据
inputBlob, // 输出数据
1 / 255.0, //归一化
inputSize, //YOLOV5输入尺寸
Scalar(0, 0, 0), //未减去均值
true, //转换RB通道
false);
...
}
```
## 推理
完成图像预处理以及YOLOV5目标检测相关参数设置之后开始执行推理,利用migraphx推理计算得到YOLOV5模型的输出。
```
ErrorCode DetectorYOLOV5::Detect(const cv::Mat &srcImage, std::vector &relInputShape, std::vector &resultsOfDetection)
{
...
// 创建输入数据
migraphx::parameter_map inputData;
inputData[inputName]= migraphx::argument{migraphx::shape(inputShape.type(), relInputShape), (float*)inputBlob.data};
// 推理
std::vector inferenceResults = net.eval(inputData);
// 获取推理结果
std::vector outs;
migraphx::argument result = inferenceResults[0];
// 转换为cv::Mat
migraphx::shape outputShape = result.get_shape();
int shape[]={outputShape.lens()[0],outputShape.lens()[1],outputShape.lens()[2]};
cv::Mat out(3,shape,CV_32F);
memcpy(out.data,result.data(),sizeof(float)*outputShape.elements());
outs.push_back(out);
...
}
```
YOLOV5的MIGraphX推理结果inferenceResults是一个std::vector< migraphx::argument >类型,YOLOV5的onnx模型包含一个输出,所以result等于inferenceResults[0],result包含三个维度:outputShape.lens()[0]=1表示batch信息,outputShape.lens()[1]=22743表示生成anchor数量,outputShape.lens()[2]=85表示对每个anchor的预测信息。同时可将85拆分为4+1+80,前4个参数用于判断每一个特征点的回归参数,回归参数调整后可以获得预测框,第5个参数用于判断每一个特征点是否包含物体,最后80个参数用于判断每一个特征点所包含的物体种类。获取上述信息之后进行anchors筛选,筛选过程分为两个步骤:
- 第一步根据objectThreshold阈值进行筛选,大于该阈值则判断当前anchor内包含物体,小于该阈值则判断无物体
- 第二步根据confidenceThreshold阈值进行筛选,当满足第一步阈值anchor的最大置信度得分maxClassScore大于该阈值,则进一步获取当前anchor的坐标信息和预测物体类别信息,小于该阈值则不做处理。
```
ErrorCode DetectorYOLOV5::Detect(const cv::Mat &srcImage, std::vector &relInputShape, std::vector &resultsOfDetection)
{
...
//获取先验框的个数
int numProposal = outs[0].size[1];
int numOut = outs[0].size[2];
//变换输出的维度
outs[0] = outs[0].reshape(0, numProposal);
//生成先验框
std::vector confidences;
std::vector boxes;
std::vector classIds;
float ratioh = (float)srcImage.rows / inputSize.height, ratiow = (float)srcImage.cols / inputSize.width;
//计算cx,cy,w,h,box_sore,class_sore
int n = 0, rowInd = 0;
float* pdata = (float*)outs[0].data;
for (n = 0; n < numProposal; n++)
{
float boxScores = pdata[4];
if (boxScores > yolov5Parameter.objectThreshold)
{
cv::Mat scores = outs[0].row(rowInd).colRange(5, numOut);
cv::Point classIdPoint;
double maxClassScore;
cv::minMaxLoc(scores, 0, &maxClassScore, 0, &classIdPoint);
maxClassScore *= boxScores;
if (maxClassScore > yolov5Parameter.confidenceThreshold)
{
const int classIdx = classIdPoint.x;
float cx = pdata[0] * ratiow;
float cy = pdata[1] * ratioh;
float w = pdata[2] * ratiow;
float h = pdata[3] * ratioh;
int left = int(cx - 0.5 * w);
int top = int(cy - 0.5 * h);
confidences.push_back((float)maxClassScore);
boxes.push_back(cv::Rect(left, top, (int)(w), (int)(h)));
classIds.push_back(classIdx);
}
}
rowInd++;
pdata += numOut;
}
...
}
```
为了消除重叠锚框,输出最终的YOLOV5目标检测结果,执行非极大值抑制对筛选之后的anchor进行处理,最后保存检测结果到resultsOfDetection中。
```
ErrorCode DetectorYOLOV5::Detect(const cv::Mat &srcImage, std::vector &relInputShape, std::vector &resultsOfDetection)
{
...
// 执行non maximum suppression消除冗余重叠boxes
std::vector indices;
cv::dnn::NMSBoxes(boxes, confidences, yolov5Parameter.confidenceThreshold, yolov5Parameter.nmsThreshold, indices);
for (size_t i = 0; i < indices.size(); ++i)
{
int idx = indices[i];
int classID=classIds[idx];
string className=classNames[classID];
float confidence=confidences[idx];
cv::Rect box = boxes[idx];
//保存每个最终预测anchor的坐标值、置信度分数、类别ID
ResultOfDetection result;
result.boundingBox=box;
result.confidence=confidence;// confidence
result.classID=classID; // label
result.className=className;
resultsOfDetection.push_back(result);
}
...
}
```
## 检测器参数设置
samples工程中的Resource/Configuration.xml文件的DetectorYOLOV5节点表示YOLOV5检测器的参数,相关参数主要依据官方推理示例进行设置。各个参数含义如下:
- ModelPath:yolov5模型存放路径
- ClassNameFile:coco数据集类别文件存放路径
- UseFP16:是否使用FP16推理模式
- NumberOfClasses:检测类别数量
- ConfidenceThreshold:置信度阈值,用于判断anchor内的物体是否为正样本
- NMSThreshold:非极大值抑制阈值,用于消除重复框
- ObjectThreshold:用于判断anchor内部是否有物体
```
"../Resource/Models/yolov5s_Nx3xNxN.onnx"
"../Resource/Models/coco.names"
0
80
0.25
0.5
0.5
```
## 模型初始化
模型初始化首先通过parse_onnx()函数加载YOLOV5的onnx模型,本示例构建YOLOV5动态shape推理,所以需要设置模型输入的最大shape,本示例设为{1,3,800,800},并可以通过program的get_parameter_shapes()函数获取网络的输入属性。完成模型加载之后需要使用compile()方法编译模型,编译模式使用migraphx::gpu::target{}设为GPU模式,编译过程主要基于MIGraphX IR完成各种优化。同时如果需要使用低精度量化进行推理,可以使用quantize_fp16()函数实现。
```
ErrorCode DetectorYOLOV5::Initialize(InitializationParameterOfDetector initializationParameterOfDetector)
{
...
migraphx::onnx_options onnx_options;
onnx_options.map_input_dims["images"]={1,3,800,800};
net = migraphx::parse_onnx(modelPath, onnx_options);
LOG_INFO(stdout,"succeed to load model: %s\n",GetFileName(modelPath).c_str());
// 获取模型输入属性
std::unordered_map inputMap=net.get_parameter_shapes();
inputName=inputMap.begin()->first;
inputShape=inputMap.begin()->second;
int N=inputShape.lens()[0];
int C=inputShape.lens()[1];
int H=inputShape.lens()[2];
int W=inputShape.lens()[3];
inputSize=cv::Size(W,H);
// 设置模型为GPU模式
migraphx::target gpuTarget = migraphx::gpu::target{};
// 量化
if(useFP16)
{
migraphx::quantize_fp16(net);
}
// 编译模型
migraphx::compile_options options;
options.device_id=0;
options.offload_copy=true;
net.compile(gpuTarget,options);
LOG_INFO(stdout,"succeed to compile model: %s\n",GetFileName(modelPath).c_str());
...
}
```
## 预处理
在将数据输入到模型之前,需要对图像做如下预处理操作:
1. 转换数据排布为NCHW
2. 归一化[0.0, 1.0]
3. 将输入数据的尺寸变换到YOLOV5动态输入大小,relInputShape为每次实际inputshape
```
ErrorCode DetectorYOLOV5::Detect(const cv::Mat &srcImage, std::vector &relInputShape, std::vector &resultsOfDetection)
{
...
inputSize = cv::Size(relInputShape[3], relInputShape[2]);
// 预处理并转换为NCHW
cv::Mat inputBlob;
blobFromImage(srcImage, // 输入数据
inputBlob, // 输出数据
1 / 255.0, //归一化
inputSize, //YOLOV5输入尺寸
Scalar(0, 0, 0), //未减去均值
true, //转换RB通道
false);
...
}
```
## 推理
完成图像预处理以及YOLOV5目标检测相关参数设置之后开始执行推理,利用migraphx推理计算得到YOLOV5模型的输出。
```
ErrorCode DetectorYOLOV5::Detect(const cv::Mat &srcImage, std::vector &relInputShape, std::vector &resultsOfDetection)
{
...
// 创建输入数据
migraphx::parameter_map inputData;
inputData[inputName]= migraphx::argument{migraphx::shape(inputShape.type(), relInputShape), (float*)inputBlob.data};
// 推理
std::vector inferenceResults = net.eval(inputData);
// 获取推理结果
std::vector outs;
migraphx::argument result = inferenceResults[0];
// 转换为cv::Mat
migraphx::shape outputShape = result.get_shape();
int shape[]={outputShape.lens()[0],outputShape.lens()[1],outputShape.lens()[2]};
cv::Mat out(3,shape,CV_32F);
memcpy(out.data,result.data(),sizeof(float)*outputShape.elements());
outs.push_back(out);
...
}
```
YOLOV5的MIGraphX推理结果inferenceResults是一个std::vector< migraphx::argument >类型,YOLOV5的onnx模型包含一个输出,所以result等于inferenceResults[0],result包含三个维度:outputShape.lens()[0]=1表示batch信息,outputShape.lens()[1]=22743表示生成anchor数量,outputShape.lens()[2]=85表示对每个anchor的预测信息。同时可将85拆分为4+1+80,前4个参数用于判断每一个特征点的回归参数,回归参数调整后可以获得预测框,第5个参数用于判断每一个特征点是否包含物体,最后80个参数用于判断每一个特征点所包含的物体种类。获取上述信息之后进行anchors筛选,筛选过程分为两个步骤:
- 第一步根据objectThreshold阈值进行筛选,大于该阈值则判断当前anchor内包含物体,小于该阈值则判断无物体
- 第二步根据confidenceThreshold阈值进行筛选,当满足第一步阈值anchor的最大置信度得分maxClassScore大于该阈值,则进一步获取当前anchor的坐标信息和预测物体类别信息,小于该阈值则不做处理。
```
ErrorCode DetectorYOLOV5::Detect(const cv::Mat &srcImage, std::vector &relInputShape, std::vector &resultsOfDetection)
{
...
//获取先验框的个数
int numProposal = outs[0].size[1];
int numOut = outs[0].size[2];
//变换输出的维度
outs[0] = outs[0].reshape(0, numProposal);
//生成先验框
std::vector confidences;
std::vector boxes;
std::vector classIds;
float ratioh = (float)srcImage.rows / inputSize.height, ratiow = (float)srcImage.cols / inputSize.width;
//计算cx,cy,w,h,box_sore,class_sore
int n = 0, rowInd = 0;
float* pdata = (float*)outs[0].data;
for (n = 0; n < numProposal; n++)
{
float boxScores = pdata[4];
if (boxScores > yolov5Parameter.objectThreshold)
{
cv::Mat scores = outs[0].row(rowInd).colRange(5, numOut);
cv::Point classIdPoint;
double maxClassScore;
cv::minMaxLoc(scores, 0, &maxClassScore, 0, &classIdPoint);
maxClassScore *= boxScores;
if (maxClassScore > yolov5Parameter.confidenceThreshold)
{
const int classIdx = classIdPoint.x;
float cx = pdata[0] * ratiow;
float cy = pdata[1] * ratioh;
float w = pdata[2] * ratiow;
float h = pdata[3] * ratioh;
int left = int(cx - 0.5 * w);
int top = int(cy - 0.5 * h);
confidences.push_back((float)maxClassScore);
boxes.push_back(cv::Rect(left, top, (int)(w), (int)(h)));
classIds.push_back(classIdx);
}
}
rowInd++;
pdata += numOut;
}
...
}
```
为了消除重叠锚框,输出最终的YOLOV5目标检测结果,执行非极大值抑制对筛选之后的anchor进行处理,最后保存检测结果到resultsOfDetection中。
```
ErrorCode DetectorYOLOV5::Detect(const cv::Mat &srcImage, std::vector &relInputShape, std::vector &resultsOfDetection)
{
...
// 执行non maximum suppression消除冗余重叠boxes
std::vector indices;
cv::dnn::NMSBoxes(boxes, confidences, yolov5Parameter.confidenceThreshold, yolov5Parameter.nmsThreshold, indices);
for (size_t i = 0; i < indices.size(); ++i)
{
int idx = indices[i];
int classID=classIds[idx];
string className=classNames[classID];
float confidence=confidences[idx];
cv::Rect box = boxes[idx];
//保存每个最终预测anchor的坐标值、置信度分数、类别ID
ResultOfDetection result;
result.boundingBox=box;
result.confidence=confidence;// confidence
result.classID=classID; // label
result.className=className;
resultsOfDetection.push_back(result);
}
...
}
```