# VAR
## 论文
`Visual Autoregressive Modeling: Scalable Image Generation via Next-Scale Prediction`
- https://arxiv.org/abs/2404.02905
## 模型结构
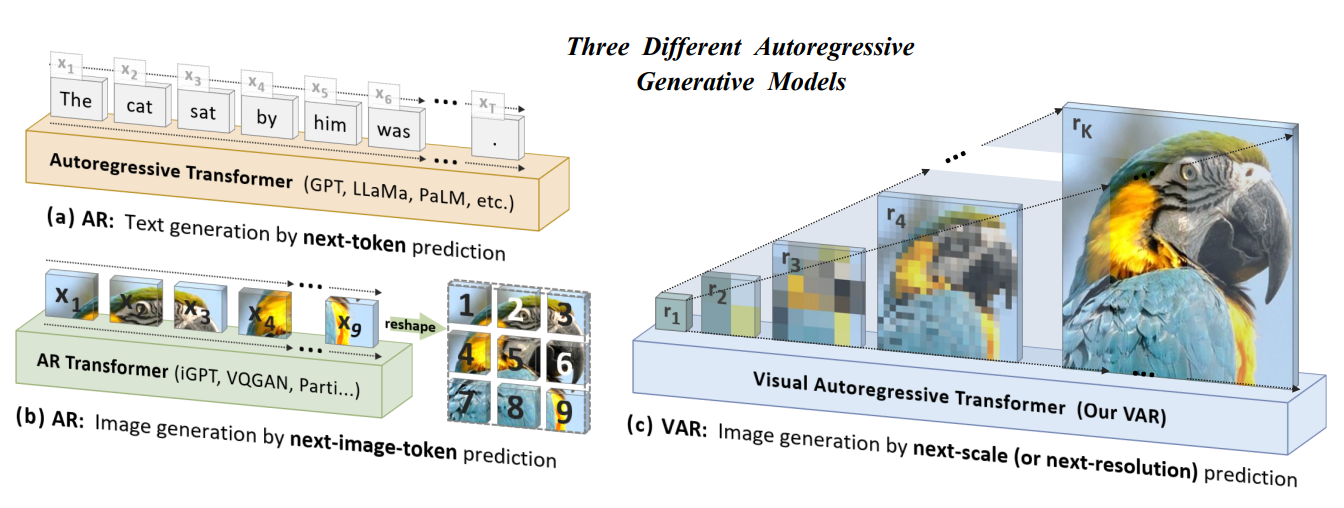
VAR模型将图像的自回归学习重新定义为从粗糙到精细的“下一尺度预测”或“下一分辨率预测”的方法,与传统的栅格扫描“下一个标记预测”不同。采用多尺度向量量化变分自编码器(VQ-VAE)将图像编码为不同分辨率的标记图(token maps),并利用视觉自回归变换器(VAR transformer)来学习图像的分布。VQ-VAE首先将图像编码成多尺度的 token maps ,自回归的过程中从 1x1 大小的 token maps 出发,逐步扩大图像尺寸。在每一步图像扩展中,VAR transformer网络基于之前不同尺寸图像生成下一个更高分辨率的 token maps 。
## 算法原理
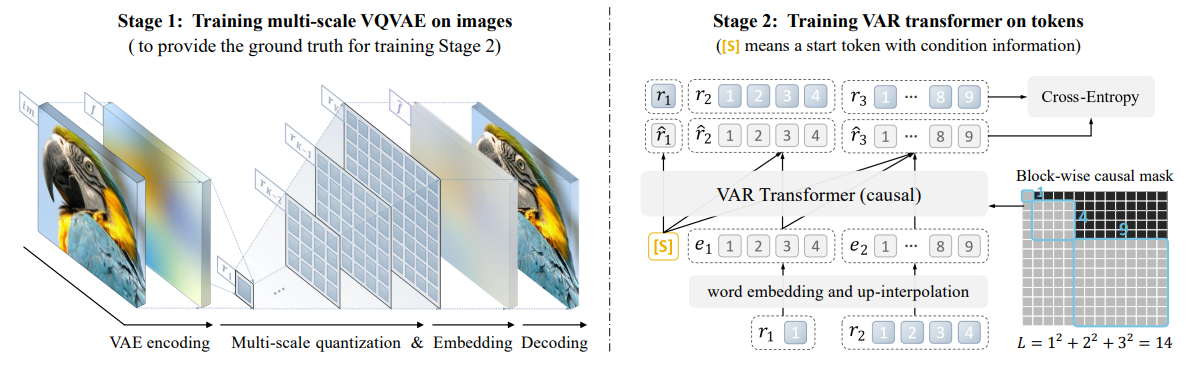
1、多尺度向量量化变分自编码器(VQ-VAE):将图像编码为不同分辨率的标记图(token maps)
(a)图像经过变分自编码器得到特征图f
(b)对于每个设定的尺度,对f插值得到对应尺度图,并使用码本(通常基于最近匹配原则)对特征进行量化,将连续特征转换为离散的token
(c)多尺度的特征编码是基于残差(residual)方式进行
(d)通过嵌入(Embedding)将离散 token 转换为连续嵌入向量的过程
(e)基于多尺度特征恢复特征图f后,经过解码器得到重建图像,再通过重建损失等训练VQ-VAE
2、视觉自回归变换器(VAR transformer):学习图像的分布
(a)使用类 GPT 的解码器结构进行自回归学习,学习基于低分辨率的 token maps 预测高分辨率的 token maps
(b)使用多尺度 VQVAE 输出的多尺度 token maps 作为真值,监督模型训练
(c)同一尺度的整个 token maps 是同时生成的,而非逐个按顺序生成的
## 代码改动说明
ps:仓库中是改动后的代码,不需再次修改
```
# 1、VAR/train.py
is_val_and_also_saving = (ep + 1) % 1 == 0 or (ep + 1) == args.ep # 训练时间过长,为防止中断修改为每轮保存一次模型,原为(ep + 1) % 10
vae_ckpt = '/path/your_code_data/VAR/vae_ch160v4096z32.pth' # 修改vae模型位置
# 2、VAR/models/basic_var.py
fused_mlp_func = None # import下添加,dcu不支持 fused_dense.linear_act_forward
memory_efficient_attention = None # import下添加,对于该仓库xformers没有适合dcu的算子
```
## 环境配置
### Docker(方法一)
```
docker pull image.sourcefind.cn:5000/dcu/admin/base/pytorch:2.1.0-ubuntu20.04-dtk24.04.1-py3.10
docker run -it --network=host --privileged=true --name=var --device=/dev/kfd --device=/dev/dri --group-add video --shm-size=32G --cap-add=SYS_PTRACE --security-opt seccomp=unconfined -v /path/your_code_data/:/path/your_code_data/ -v /opt/hyhal/:/opt/hyhal/:ro /bin/bash # 为以上拉取的docker的镜像ID替换
cd /your_code_path/VAR
pip config set global.index-url https://pypi.tuna.tsinghua.edu.cn/simple
pip install -r requirements.txt
wget https://download.sourcefind.cn:65024/directlink/4/flash_attn/DAS1.1/flash_attn-2.0.4+das1.1gitc7a8c18.abi1.dtk2404.torch2.1-cp310-cp310-manylinux_2_31_x86_64.whl
pip install flash_attn-2.0.4+das1.1gitc7a8c18.abi1.dtk2404.torch2.1-cp310-cp310-manylinux_2_31_x86_64.whl
git config --global --add safe.directory /your_code_path/VAR
```
### Dockerfile(方法二)
```
docker build --no-cache -t var:latest .
docker run -it --network=host --privileged=true --name=var --device=/dev/kfd --device=/dev/dri --group-add video --shm-size=32G --cap-add=SYS_PTRACE --security-opt seccomp=unconfined -v /path/your_code_data/:/path/your_code_data/ -v /opt/hyhal/:/opt/hyhal/:ro var /bin/bash
cd /path/your_code_data/VAR
pip config set global.index-url https://pypi.tuna.tsinghua.edu.cn/simple
pip install -r requirements.txt
wget https://download.sourcefind.cn:65024/directlink/4/flash_attn/DAS1.1/flash_attn-2.0.4+das1.1gitc7a8c18.abi1.dtk2404.torch2.1-cp310-cp310-manylinux_2_31_x86_64.whl
pip install flash_attn-2.0.4+das1.1gitc7a8c18.abi1.dtk2404.torch2.1-cp310-cp310-manylinux_2_31_x86_64.whl
git config --global --add safe.directory /your_code_path/VAR
```
### Anaconda(方法三)
1、关于本项目DCU显卡所需的特殊深度学习库可从光合开发者社区下载安装: https://developer.hpccube.com/tool/
```
DTK软件栈:dtk24.04.1
python:python3.10
pytorch:2.1.0
flash_attn:2.0.4
```
`Tips:以上dtk软件栈、python、pytorch等DCU相关工具版本需要严格一一对应`
2、其他非特殊库直接按照下面步骤进行安装
```
cd /path/your_code_data/VAR
pip config set global.index-url https://pypi.tuna.tsinghua.edu.cn/simple
pip install -r requirements.txt
git config --global --add safe.directory /your_code_path/VAR
```
## 训练数据集
`imagenet-1k`
仅需要ILSVRC2012_img_train.tar、ILSVRC2012_img_val.tar作为数据集,可通过[scnet](http://113.200.138.88:18080/aidatasets/project-dependency/imagenet-2012)或[官网链接](https://image-net.org/challenges/LSVRC/2012/2012-downloads.php)进行下载,下载后的压缩包需要进行预处理。通过官网下载和处理数据集的代码如下:
ps:本仓库准备了小数据集供训练测试,数据量约为完整数据集的1/130,可通过[scnet](http://113.200.138.88:18080/aidatasets/project-dependency/var)进行下载。
```
cd /path/your_code_data/VAR
mkdir dataset
# 通过官网下载imagenet-1k的训练集和验证集
wget https://image-net.org/data/ILSVRC/2012/ILSVRC2012_img_val.tar -P ./dataset
wget https://image-net.org/data/ILSVRC/2012/ILSVRC2012_img_train.tar -P ./dataset
# 数据集处理:将1000个tar解压至train/val文件夹中,对应的每类图片建立自己的对应文件夹。方便pytorch读取及图片分类。
cd dataset
mkdir train && mv ILSVRC2012_img_train.tar train/ && cd train && tar -xvf ILSVRC2012_img_train.tar && rm ILSVRC2012_img_train.tar
find . -name "*.tar" | while read NAME ; do mkdir -p "${NAME%.tar}"; tar -xvf "${NAME}" -C "${NAME%.tar}"; rm -f "${NAME}"; done
mkdir val && mv ILSVRC2012_img_val.tar val/ && cd val && tar -xvf ILSVRC2012_img_val.tar && rm ILSVRC2012_img_val.tar
wget -qO- https://raw.githubusercontent.com/soumith/imagenetloader.torch/master/valprep.sh | bash
```
数据集目录结构如下:
```
── dataset
│ ├── train
│ │ ├── n01440764
│ │ │ ├── n01440764_18.JPEG
│ │ │ └── ...
│ │ ├── n01443537
│ │ │ ├── n01443537_2.JPEG
│ │ │ └── ...
│ │ └── ...
│ └── val
│ ├── n01440764
│ │ ├── ILSVRC2012_val_00000293.JPEG
│ │ └── ...
│ ├── n01443537
│ │ ├── ILSVRC2012_val_00000236.JPEG
│ │ └── ...
│ └── ...
```
## 训练
本仓库未提供VQ-VAE模块的训练代码,因此训练时必须下载权重vae_ch160v4096z32。权重vae_ch160v4096z32可通过[scnet](http://113.200.138.88:18080/aimodels/findsource-dependency/var_pytorch)或[huggingface](https://huggingface.co/FoundationVision/var/tree/main)进行下载,通过huggingface下载的代码如下:
```
cd /path/your_code_data/VAR
export HF_DATASETS_CACHE="./checkpoint"
export HF_ENDPOINT=https://hf-mirror.com
huggingface-cli download --resume-download FoundationVision/var vae_ch160v4096z32.pth --local-dir checkpoint
```
### 单机多卡
```
cd /path/your_code_data/VAR
HIP_VISIBLE_DEVICES=0,1,2,3 torchrun --nproc_per_node=4 --nnodes=1 --node_rank=0 train.py \
--depth=16 --bs=192 --ep=3 --fp16=1 --alng=1e-3 --wpe=0.1 \
--data_path=/home/VAR/dataset
# torchrun: 这是启动分布式训练的命令。
# --nproc_per_node=8: 指定每个节点上使用的进程数(即每个节点上参与训练的 GPU 数量)。
# --nnodes=...: 指定参与训练的节点总数。
# --node_rank=...: 指定当前节点的编号(从 0 开始)。
# --master_addr=...: 指定主节点的 IP 地址。
# --master_port=...: 指定主节点上用于通信的端口号。
# --depth=16: 设置模型的深度。
# --bs=768: 设置批处理大小。
# --ep=200: 设置训练的总轮数(epoch)。
# --fp16=1: 启用FP16训练。
# --alng=1e-3: 初始化ada_lin.w[gamma channels]
# --wpe=0.1: 训练结束时的最终lr
# --data_path:数据集地址
```
## 推理
检查点可通过[scnet](http://113.200.138.88:18080/aimodels/findsource-dependency/var_pytorch)或[huggingface](https://huggingface.co/FoundationVision/var/tree/main)进行下载,通过huggingface下载的代码如下:
```
cd /path/your_code_data/VAR
export HF_DATASETS_CACHE="./checkpoint"
export HF_ENDPOINT=https://hf-mirror.com
huggingface-cli download --resume-download FoundationVision/var --local-dir checkpoint
```
test.py内可以修改推理参数,其中class_labels决定了生成图像的数量和类别,第n个元素为生成的第n张图像的imagenet标签。推理代码如下:
```
cd /path/your_code_data/VAR
python test.py
```
注:imagenet标签与classes的映射文件已被整理在VAR/doc/imagenet_classes.txt、VAR/doc/imagenet_synsets.txt,用法如下:imagenet标签是980,需要先在imagenet_classes.txt中找到第981行class(因为索引从0开始,所以是第981个类别)是 n09472597,然后再在imagenet_synsets.txt中搜索序号n09472597对应的含义是volcano,即生成的图像是火山。
## result
test.py默认推理结果为:
### 精度
以下为默认训练结果:
| | 测试参数 | 软件栈 | final loss |
| -------------------------------- | ------------------------------------------------ | ---------- | ---------- |
| A800 * 4
(80G,1410 Mhz) | depth=16
ep=3
bs=192
fp16=1
ep=3 | cuda11.8 | 7.173136 |
| k100ai * 4
(64G,1400 Mhz) | depth=16
ep=3
bs=192
fp16=1
ep=3 | dtk24.04.1 | 7.151511 |
## 应用场景
### 算法类别
`以文生图`
### 热点应用行业
`家具,电商,医疗,广媒,教育`
## 预训练权重
- http://113.200.138.88:18080/aimodels/findsource-dependency/var_pytorch
- https://huggingface.co/FoundationVision/var/tree/main
## 源码仓库及问题反馈
- https://developer.sourcefind.cn/codes/modelzoo/var_pytorch
## 参考资料
- https://github.com/FoundationVision/VAR
