# Real-ESRGAN
## 论文
[Real-ESRGAN: Training Real-World Blind Super-Resolution with Pure Synthetic Data](https://arxiv.org/abs/2107.10833)
## 模型结构
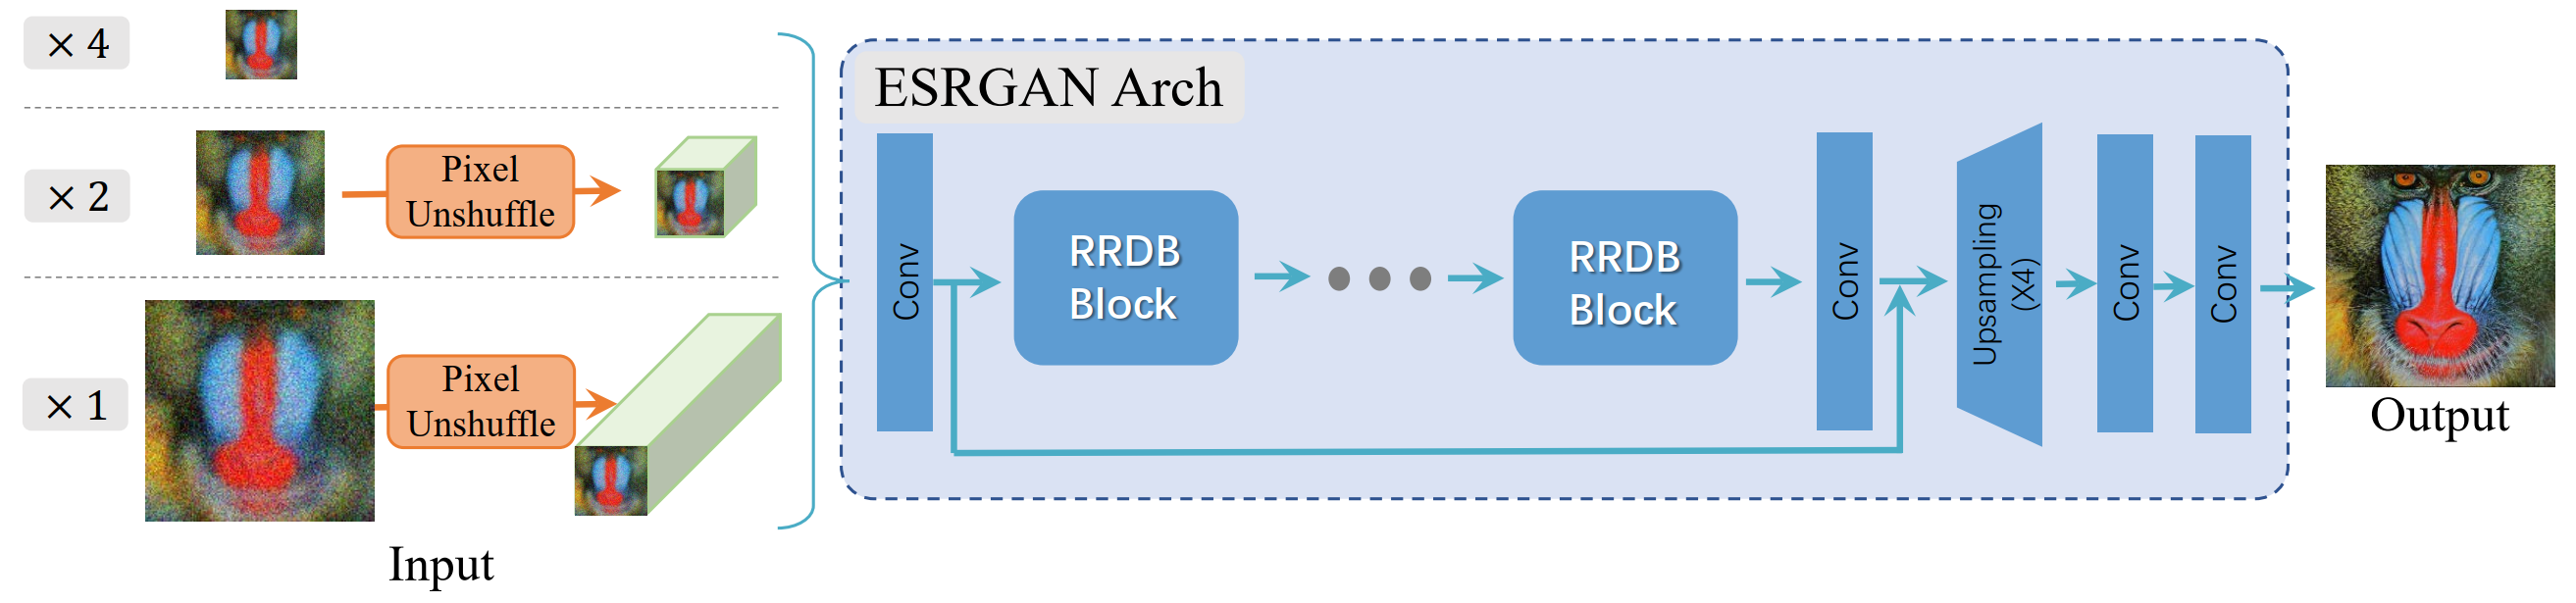
生成网络: 采用ESRGAN的生成网络, 对于x4倍的超分辨, 网络完全按照ESRGAN的生成器执行;对x2和x1倍的超分辨, 网络先进行pixel-unshuffle(pixel-shuffl的反操作, pixel-shuffle可理解为通过压缩图像通道而对图像尺寸进行放大), 以降低图像分辨率为前提, 对图像通道数进行扩充, 然后将处理后的图像输入网络进行超分辨重建。
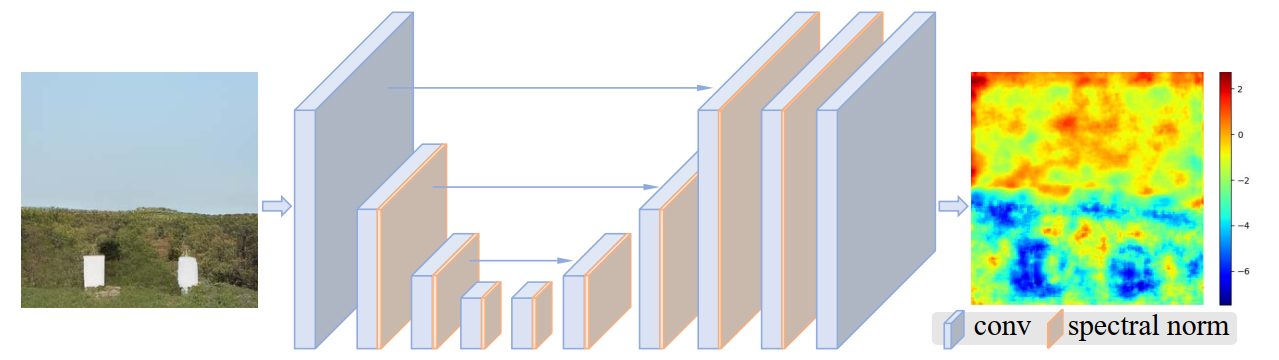
对抗网络: 由于使用的复杂的构建数据集的方式, 所以需要使用更先进的判别器对生成图像进行判别。使用U-Net判别器可以在像素角度, 对单个生成的像素进行真假判断, 这能够在保证生成图像整体真实的情况下, 注重生成图像细节。
## 算法原理
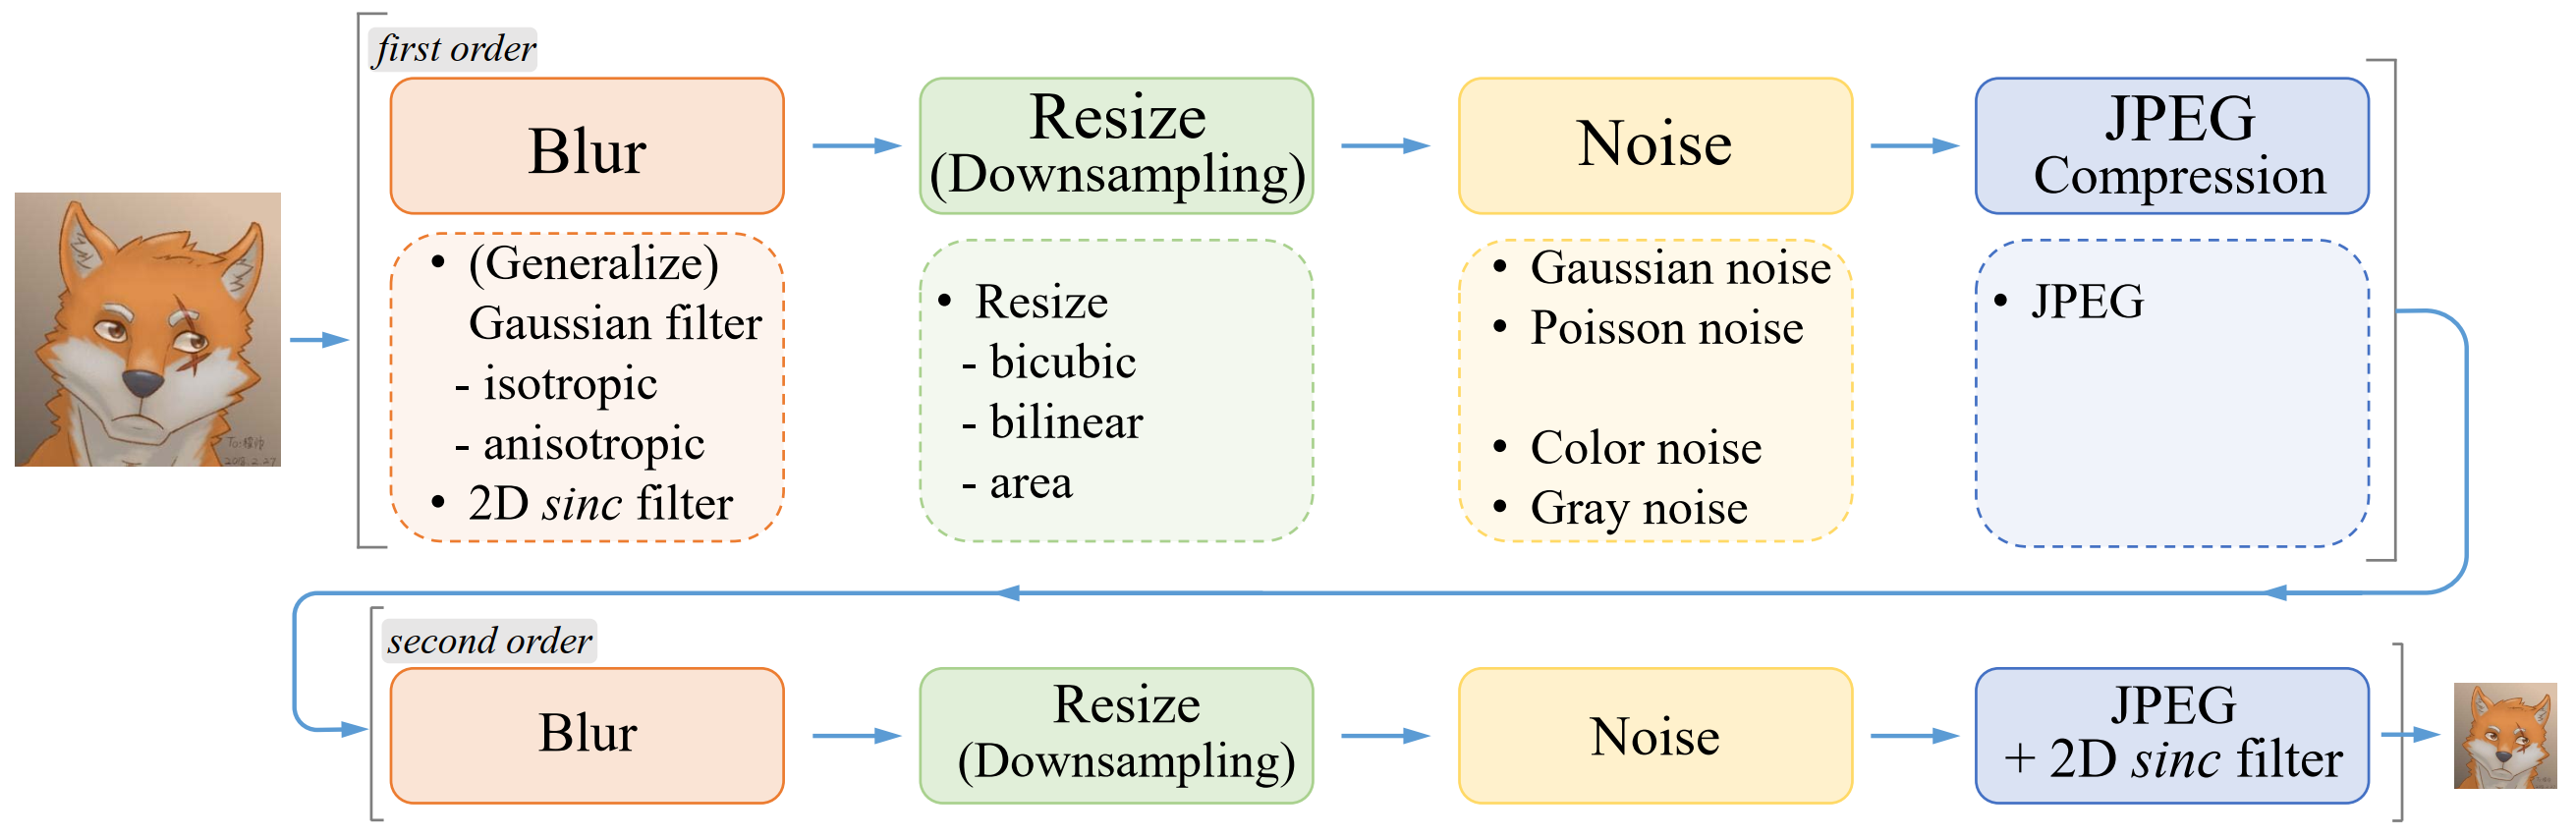
通过使用更实用的退化过程合成训练对, 扩展强大的ESRGAN以恢复一般的真实世界LR图像。
## 环境配置
-v 路径、docker_name和imageID根据实际情况修改
### Docker(方法一)
```bash
docker pull image.sourcefind.cn:5000/dcu/admin/base/pytorch:1.13.1-centos7.6-dtk-23.04.1-py38-latest
docker run -it -v /path/your_code_data/:/path/your_code_data/ --shm-size=32G --privileged=true --device=/dev/kfd --device=/dev/dri/ --group-add video --name docker_name imageID bash
cd /your_code_path/real-esrgan_pytorch
pip install -r requirements.txt
python setup.py develop
```
### Dockerfile(方法二)
```bash
cd ./docker
docker build --no-cache -t real_esrgan:latest .
docker run -it -v /path/your_code_data/:/path/your_code_data/ --shm-size=32G --privileged=true --device=/dev/kfd --device=/dev/dri/ --group-add video --name docker_name imageID bash
cd /your_code_path/real-esrgan_pytorch
pip install -r requirements.txt
python setup.py develop
```
### Anaconda(方法三)
1、关于本项目DCU显卡所需的特殊深度学习库可从光合开发者社区下载安装: https://developer.hpccube.com/tool/
```bash
DTK软件栈:dtk23.04.1
python:python3.8
torch:1.13.1
torchvision:0.14.1
```
Tips:以上dtk软件栈、python、torch等DCU相关工具版本需要严格一一对应
2、其他非特殊库直接按照下面步骤进行安装
```bash
pip install -r requirements.txt
python setup.py develop
```
## 数据集
### 准备数据集
所需数据集为: DF2K ( DIV2K 和 Flickr2K ) + OST. 仅需要 HR 图片.
[DIV2K](http://data.vision.ee.ethz.ch/cvl/DIV2K/DIV2K_train_HR.zip)
[Flickr2K](https://cv.snu.ac.kr/research/EDSR/Flickr2K.tar)
[OST](https://openmmlab.oss-cn-hangzhou.aliyuncs.com/datasets/OST_dataset.zip)
[ADE20K](https://groups.csail.mit.edu/vision/datasets/ADE20K/)
ADE20K数据需要预处理:
```bash
python gen_20k_val.py --root_path /path/of/ADE20K_2021_17_01 --save_path datasets/ADE20K_val
```
据集的目录结构如下:
```bash
├── datasets
│ ├── DF2K
│ ├── DF2K_HR # 将DIV2K和Flickr2K的HR图像放于这里
│ ├── DF2K_HR_sub # 生成的
│ ├── DF2K_multiscale # 生成的
│ ├── DF2K_multiscale_sub # 生成的
│ └── meta_info # 生成的
│ ├── OST
│ ├── train_HR # 将OST的HR图像放于这里
│ ├── train_HR_sub
│ ├── ADE20K_2021_17_01
│ ├── images
│ ├── objects.txt
│ ├── ADE20K_val # 生成的
```
Tips: 项目提供了tiny_datasets进行快速上手测试, 如需使用tiny_datasets, 下面的数据路径需进行对应修改。
### 预处理数据集
#### 1.【可选】生成多尺寸图片
如果只想简单试试而不进行准确训练, 那么该过程可选。
针对 DF2K 数据集, 我们使用多尺寸缩放策略,对 HR 图像进行下采样, 获得多尺寸的标准参考(Ground-Truth)图像。
使用 [scripts/generate_multiscale_DF2K.py](scripts/generate_multiscale_DF2K.py) 脚本快速生成多尺寸的图像。
```bash
# example
python scripts/generate_multiscale_DF2K.py --input datasets/DF2K/DF2K_HR --output datasets/DF2K/DF2K_multiscale
```
#### 2.【可选】裁切为子图像
如果你的 IO 够好或储存空间有限, 那么此步骤是可选的。
使用[scripts/extract_subimages.py](scripts/extract_subimages.py) 将 DF2K 图像裁切为子图像, 以加快 IO 和处理速度。
```bash
# example
python scripts/extract_subimages.py --input datasets/DF2K/DF2K_HR --output datasets/DF2K/DF2K_HR_sub --crop_size 400 --step 200
```
#### 3. 准备元信息 txt
1. 使用 [scripts/generate_meta_info.py](scripts/generate_meta_info.py) 生成包含图像路径的 txt 文件。
2. 还可以合并多个文件夹的图像路径到一个元信息(meta_info)txt, 示例参考如下:
```bash
# meta_info.txt 内容示例
# DF2K_HR_sub/000001_s001.png
# DF2K_HR_sub/000001_s002.png
# DF2K_HR_sub/000001_s003.png
python scripts/generate_meta_info.py --input datasets/DF2K/DF2K_HR, datasets/DF2K/DF2K_multiscale --root datasets/DF2K, datasets/DF2K --meta_info datasets/DF2K/meta_info/meta_info_DF2Kmultiscale.txt
```
## 训练
### 完整训练
完整训练分为两步,第一步训练得到Real-ESRNet, 在Real-ESRNet的基础上训练得到Real-ESRGAN。
1. [训练Real-ESRNet](#训练Real-ESRNet)
2. [训练Real-ESRGAN](#训练Real-ESRGAN)
#### 训练Real-ESRNet
1. 下载预训练模型 [ESRGAN](https://github.com/xinntao/Real-ESRGAN/releases/download/v0.1.1/ESRGAN_SRx4_DF2KOST_official-ff704c30.pth), 将模型放到 `experiments/pretrained_models`目录下。
```bash
wget https://github.com/xinntao/Real-ESRGAN/releases/download/v0.1.1/ESRGAN_SRx4_DF2KOST_official-ff704c30.pth -P experiments/pretrained_models
```
2. 相应地修改 `options/train_realesrnet_x4plus.yml` 中的内容:
```yml
train:
name: DF2K+OST
type: RealESRGANDataset
dataroot_gt: datasets/DF2K # 修改为你的数据集文件夹根目录
meta_info: realesrgan/meta_info/meta_info_DF2Kmultiscale+OST_sub.txt # 修改为你自己生成的元信息txt
io_backend:
type: disk
```
如果需要指定预训练路径到其他文件, 请修改 `pretrain_network_g` 参数, 当前默认保存为`experiments/train_RealESRNetx4plus_1000k_B12G4_fromESRGAN/models/net_g_1000000.pth`。
3. 如果你想在训练过程中执行验证, 就取消注释这些内容并进行相应的修改:
```yml
# 取消注释这些以进行验证
# val:
# name: validation
# type: PairedImageDataset
# dataroot_gt: path_to_gt
# dataroot_lq: path_to_lq
# io_backend:
# type: disk
...
# 取消注释这些以进行验证
# 验证设置
# val:
# val_freq: !!float 5e3
# save_img: True
# metrics:
# psnr: # 指标名称, 可以是任意的
# type: calculate_psnr
# crop_border: 4
# test_y_channel: false
```
#### 训练Real-ESRGAN
1. Real-ESRNet模型训练完成后,得到`experiments/train_RealESRNetx4plus_1000k_B12G4_fromESRGAN/models/net_g_1000000.pth`;
2. 大多数修改与上面列出的类似, 相应地修改文件 `options/train_realesrgan_x4plus.yml` 中的内容. 如果需要指定其他文件的预训练路径, 请修改 `pretrain_network_g` 参数.
### 微调Real-ESRGAN
你可以用自己的数据集微调Real-ESRGAN。一般地, 微调(Fine-Tune)程序可以分为两种类型:
1. [动态生成降级图像](#动态生成降级图像)
2. [使用**已配对**的数据](#使用已配对的数据)
#### 动态生成降级图像
只需要高分辨率图像, 在训练过程中, 使用 Real-ESRGAN 描述的降级模型生成低质量图像。
1. 下载预训练模型到 `experiments/pretrained_models` 目录下:
- *RealESRGAN_x4plus.pth*:
```bash
wget https://github.com/xinntao/Real-ESRGAN/releases/download/v0.1.0/RealESRGAN_x4plus.pth -P experiments/pretrained_models
```
- *RealESRGAN_x4plus_netD.pth*:
```bash
wget https://github.com/xinntao/Real-ESRGAN/releases/download/v0.2.2.3/RealESRGAN_x4plus_netD.pth -P experiments/pretrained_models
```
2. 修改选项文件 [options/finetune_realesrgan_x4plus.yml](options/finetune_realesrgan_x4plus.yml), 特别是 `datasets` 部分:
```yml
train:
name: DF2K+OST
type: RealESRGANDataset
dataroot_gt: datasets/DF2K # 修改为你的数据集文件夹根目录
meta_info: realesrgan/meta_info/meta_info_DF2Kmultiscale+OST_sub.txt # 修改为你自己生成的元信息txt
io_backend:
type: disk
```
#### 使用已配对的数据
你还可以用自己已经配对的数据微调 RealESRGAN, 这个过程更类似于微调 ESRGAN。
1. 数据准备
假设你已经有两个文件夹(folder):
- **gt folder**(标准参考, 高分辨率图像):*datasets/DF2K/DIV2K_train_HR_sub*
- **lq folder**(低质量, 低分辨率图像):*datasets/DF2K/DIV2K_train_LR_bicubic_X4_sub*
然后, 使用脚本 [scripts/generate_meta_info_pairdata.py](scripts/generate_meta_info_pairdata.py) 生成元信息(meta_info)txt 文件。
```bash
python scripts/generate_meta_info_pairdata.py --input datasets/DF2K/DIV2K_train_HR_sub datasets/DF2K/DIV2K_train_LR_bicubic_X4_sub --meta_info datasets/DF2K/meta_info/meta_info_DIV2K_sub_pair.txt
```
2. 下载预训练模型
下载所需预训练模型到 `experiments/pretrained_models` 目录下。
- *RealESRGAN_x4plus.pth*:
```bash
wget https://github.com/xinntao/Real-ESRGAN/releases/download/v0.1.0/RealESRGAN_x4plus.pth -P experiments/pretrained_models
```
- *RealESRGAN_x4plus_netD.pth*:
```bash
wget https://github.com/xinntao/Real-ESRGAN/releases/download/v0.2.2.3/RealESRGAN_x4plus_netD.pth -P experiments/pretrained_models
```
3. 微调准备
修改 [options/finetune_realesrgan_x4plus_pairdata.yml](options/finetune_realesrgan_x4plus_pairdata.yml) 中的配置项, 特别是 `datasets` 部分:
```yml
train:
name: DIV2K
type: RealESRGANPairedDataset
dataroot_gt: datasets/DF2K # 修改为你的 gt folder 文件夹根目录
dataroot_lq: datasets/DF2K # 修改为你的 lq folder 文件夹根目录
meta_info: datasets/DF2K/meta_info/meta_info_DIV2K_sub_pair.txt # 修改为你自己生成的元信息txt
io_backend:
type: disk
```
### 训练命令
#### 单机多卡
默认auto_resume模式, 根据完整训练或者微调训练, 修改-opt参数对应的yml文件。当前默认为微调训练
```bash
bash train.sh
```
#### 多机多卡
使用多节点的情况下,需要将使用节点写入hostfile文件, 多节点每个节点一行, 例如: c1xxxxxx slots=4。
默认auto_resume模式, 根据完整训练或者微调训练, 请修改`$REAL-ESRGAN_ROOT/single_process.sh`中CONFIG参数。
```bash
bash run_train_multi.sh
```
## 推理
下载预训练模型[RealESRGAN_x4plus.pth](https://github.com/xinntao/Real-ESRGAN/releases/download/v0.1.0/RealESRGAN_x4plus.pth), 将其放入 weights 文件夹下, 测试结果默认保存在results文件夹下。
```bash
# 下载预训练模型
wget https://github.com/xinntao/Real-ESRGAN/releases/download/v0.1.0/RealESRGAN_x4plus.pth -P weights
# 执行推理
python inference_realesrgan.py -n RealESRGAN_x4plus -i inputs --face_enhance
```
## result
Model: RealESRGAN_x4plus
### 精度
本项目基于ADE20K公开数据集的val数据进行效果验证,需先要对ADE20K val数据进行推理,得到推理后的结果(默认在results下).
```bash
# 执行推理
python inference_realesrgan.py --model_path weights/RealESRGAN_x4plus.pth -n RealESRGAN_x4plus -i dataset/ADE20K_val --face_enhance
python evalution.py --root_path results
```
| NIQE | ADE20K |
| :------: | :------: |
| V100S | 4.0358 |
| Z100L | 4.0314 |
## 应用场景
### 算法类别
图像超分
### 热点应用行业
交通,政府,制造
## 源码仓库及问题反馈
https://developer.hpccube.com/codes/modelzoo/real-esrgan_pytorch
## 参考资料
https://github.com/xinntao/Real-ESRGAN