# Qwen3
## 论文
[Qwen3 Technical Report](https://arxiv.org/abs/2505.09388)
## 模型结构
Qwen3是阿里巴巴集团Qwen团队研发的大语言模型和大型多模态模型系列。无论是语言模型还是多模态模型,均在大规模多语言和多模态数据上进行预训练,并通过高质量数据进行后期微调以贴近人类偏好。Qwen3具备自然语言理解、文本生成、视觉理解、音频理解、工具使用、角色扮演、作为AI Agent进行互动等多种能力 。
## 算法原理
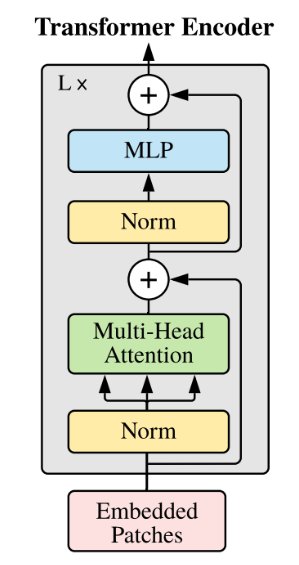
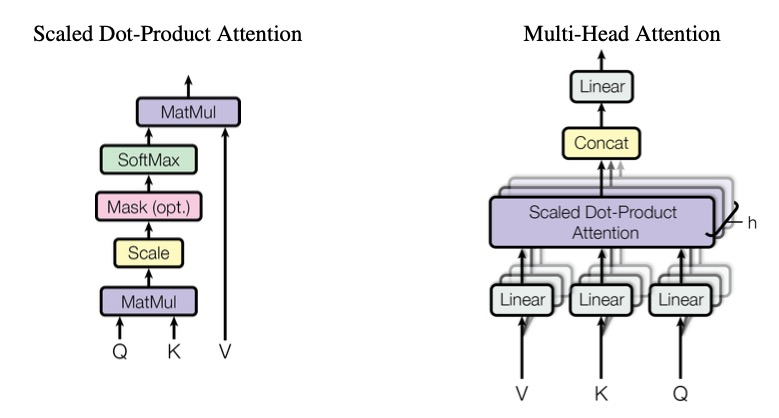
Qwen3是一个decoder-only的transformer模型,使用SwiGLU激活函数、RoPE、多头注意力机制等。
## 环境配置
### 硬件需求
DCU型号:BW1000,节点数量:1台,卡数:8张
### Docker(方法一)
提供[光源](https://www.sourcefind.cn/#/image/dcu/custom)拉取推理的docker镜像:
```
docker pull image.sourcefind.cn:5000/dcu/admin/base/vllm:0.9.2-ubuntu22.04-dtk25.04.1-rc5-rocblas104381-0915-das1.6-py3.10-20250916-rc2
# 用上面拉取docker镜像的ID替换
# 主机端路径
# 容器映射路径
# 若要在主机端和容器端映射端口需要删除--network host参数
docker run -it --name qwen3_vllm --privileged --shm-size=64G --device=/dev/kfd --device=/dev/dri/ --cap-add=SYS_PTRACE --security-opt seccomp=unconfined --ulimit memlock=-1:-1 --ipc=host --network host --group-add video -v /opt/hyhal:/opt/hyhal -v : /bin/bash
```
### Dockerfile(方法二)
```
# 主机端路径
# 容器映射路径
docker build -t qwen3:latest .
docker run -it --name qwen3_vllm --privileged --shm-size=64G --device=/dev/kfd --device=/dev/dri/ --cap-add=SYS_PTRACE --security-opt seccomp=unconfined --ulimit memlock=-1:-1 --ipc=host --network host --group-add video -v /opt/hyhal:/opt/hyhal:ro -v : qwen3:latest /bin/bash
```
### Anaconda(方法三)
```
conda create -n qwen3_vllm python=3.10
```
关于本项目DCU显卡所需的特殊深度学习库可从[光合](https://developer.sourcefind.cn/tool/)开发者社区下载安装。
* DTK驱动:dtk25.04.01
* Pytorch: 2.5.1
* triton: 3.1
* lmslim: 0.3.1
* flash_attn: 2.6.1
* flash_mla: 1.0.0
* vllm: 0.9.2
* python: python3.10
`Tips:需先安装相关依赖,最后安装vllm包`
环境变量:
export ALLREDUCE_STREAM_WITH_COMPUTE=1
export VLLM_NUMA_BIND=1
export VLLM_RANK0_NUMA=0
export VLLM_RANK1_NUMA=1
export VLLM_RANK2_NUMA=2
export VLLM_RANK3_NUMA=3
export VLLM_RANK4_NUMA=4
export VLLM_RANK5_NUMA=5
export VLLM_RANK6_NUMA=6
export VLLM_RANK7_NUMA=7
## 数据集
无
## 训练
无
## 推理
以Qwen3-235B-A22B为例
### 离线批量推理
```bash
python examples/offline_inference/basic/basic.py --tp 8 --model_path xxx
```
其中,本示例脚本在代码中直接定义了 `prompts`,并设置 `temperature=0.8`、`top_p=0.95`、`max_tokens=16`;如需调整请修改脚本中的参数。`model_path` 在脚本中指定为本地模型路径;`tensor_parallel_size=1` 表示使用 1 卡;`dtype="float16"` 为推理数据类型(若权重为 bfloat16,请相应调整)。本示例未使用 `quantization` 参数,量化推理请参考下文性能测试示例。
### 离线批量推理性能测试
1、指定输入输出
```bash
python benchmarks/benchmark_throughput.py --num-prompts 1 --input-len 32 --output-len 128 --model /your/model/path -tp 8 --trust-remote-code --enforce-eager --dtype float16 --gpu-memory-utilization 0.98
```
其中 `--num-prompts`是batch数,`--input-len`是输入seqlen,`--output-len`是输出token长度,`--model`为模型路径,`-tp`为使用卡数,`dtype="float16"`为推理数据类型。若模型权重为 bfloat16,建议设置 `--dtype bfloat16` 或使用 `--dtype auto` 以匹配权重精度。若指定 `--output-len 1`即为首字延迟。--gpu-memory-utilization为gpu显存利用率
2、使用数据集
下载数据集:
[sharegpt_v3_unfiltered_cleaned_split](https://huggingface.co/datasets/learnanything/sharegpt_v3_unfiltered_cleaned_split)
```bash
python benchmarks/benchmark_throughput.py --num-prompts 1 --model /your/model/path --dataset-name sharegpt --dataset-path /path/to/ShareGPT_V3_unfiltered_cleaned_split.json -tp 8 --trust-remote-code --enforce-eager --dtype float16 --gpu-memory-utilization 0.98
```
其中 `--num-prompts`是batch数,`--model`为模型路径,`--dataset`为使用的数据集,`-tp`为使用卡数,`dtype="float16"`为推理数据类型。若模型权重为 bfloat16,建议设置 `--dtype bfloat16` 或使用 `--dtype auto` 以匹配权重精度。--gpu-memory-utilization为gpu显存利用率
### OpenAI api服务推理性能测试
1.启动服务:
```bash
vllm serve /your/model/path --enforce-eager --dtype float16 --trust-remote-code --tensor-parallel-size 8 --gpu-memory-utilization 0.98
```
2.启动客户端
```
python benchmarks/benchmark_serving.py --model /your/model/path --dataset-name sharegpt --dataset-path /path/to/ShareGPT_V3_unfiltered_cleaned_split.json --num-prompts 1 --trust-remote-code
```
参数同使用数据集,离线批量推理性能测试,具体参考[benchmarks/benchmark_serving.py](benchmarks/benchmark_serving.py)
### OpenAI兼容服务
启动服务:
```bash
vllm serve /your/model/path --enforce-eager --dtype float16 --trust-remote-code --tensor-parallel-size 8 --gpu-memory-utilization 0.98
```
其中,<模型路径> 为本地模型路径;--dtype 指定推理数据类型;--tensor-parallel-size 表示使用多卡张量并行;--gpu-memory-utilization 设置GPU显存利用率为98%。默认使用模型自带的聊天模板。
### OpenAI Chat API和vllm结合使用
```bash
curl http://localhost:8000/v1/chat/completions \
-X POST \
-H "Content-Type: application/json" \
-d '{
"model": "/your/model/path",
"max_tokens": 128,
"messages": [
{
"role": "user",
"content": "介绍重庆美食"
}
]
}'
```
或者使用[examples/online_serving/openai_chat_completion_client.py](examples/online_serving/openai_chat_completion_client.py)
### **gradio和vllm结合使用**
1.安装gradio
```
pip install gradio
```
2.安装必要文件
2.1 启动gradio服务,根据提示操作
```
python examples/online_serving/gradio_openai_chatbot_webserver.py --model "/your/model/path" --model-url http://localhost:8000/v1 --temp 0.8 --stop-token-ids ""
```
2.2 更改文件权限
打开提示下载文件目录,输入以下命令给予权限
```
chmod +x frpc_linux_amd64_v0.*
```
2.3端口映射
```
ssh -L 8000:计算节点IP:8000 -L 8001:计算节点IP:8001 用户名@登录节点 -p 登录节点端口
```
通过跳板机(登录节点)转发端口,让你在本地访问内网计算节点上的服务(如 vLLM API)。
3.启动OpenAI兼容服务
```
vllm serve /your/model/path --enforce-eager --dtype float16 --trust-remote-code --host "0.0.0.0" --gpu-memory-utilization 0.98 --tensor-parallel-size 8
```
4.启动gradio服务
```
python examples/online_serving/gradio_openai_chatbot_webserver.py --model "/your/model/path" --model-url http://localhost:8000/v1 --temp 0.8 --stop-token-ids "" --host "0.0.0.0" --port 8001
```
5.使用对话服务
在浏览器中输入本地 URL,可以使用 Gradio 提供的对话服务。
## result
```
Prompt: 'What is deep learning?', Generated text: ' Deep learning is a subset of machine learning that involves the use of neural networks to model and solve complex problems. Neural networks are a network of interconnected nodes or " neurons" that are designed to recognize patterns in data, learn from examples, and make predictions or decisions.\nThe term "deep" in deep learning refers to the use of multiple layers or hidden layers in these neural networks. Each layer processes the input data in a different way, extracting increasingly abstract features as the data passes through.'
```
## 精度
| 模型 |
数据集 |
得分 |
| Qwen3-235B-A22B |
gsm8k |
95.83 |
| math500 |
94.2 |
| humameval |
95.73 |
## 应用场景
### 算法类别
对话问答
### 热点应用行业
金融,科研,教育
## 预训练权重
| 基座模型 |
| ----------------------------------------------------------- |
| [Qwen3-0.6B](https://huggingface.co/Qwen/Qwen3-0.6B) |
| [Qwen3-1.7B](https://huggingface.co/Qwen/Qwen3-1.7B) |
| [Qwen3-4B](https://huggingface.co/Qwen/Qwen3-4B) |
| [Qwen3-8B](https://huggingface.co/Qwen/Qwen3-8B) |
| [Qwen3-14B](https://huggingface.co/Qwen/Qwen3-14B) |
| [Qwen3-32B](https://huggingface.co/Qwen/Qwen3-32B) |
| [Qwen3-30B-A3B](https://huggingface.co/Qwen/Qwen3-30B-A3B) |
| [Qwen3-235B-A22B](https://huggingface.co/Qwen/Qwen3-235B-A22B) |
## 源码仓库及问题反馈
* [https://developer.hpccube.com/codes/modelzoo/qwen3_vllm](https://developer.hpccube.com/codes/modelzoo/qwen3_vllm)
## 参考资料
* [https://github.com/vllm-project/vllm](https://github.com/vllm-project/vllm)