# PointPillars
## 论文
[PointPillars: Fast Encoders for Object Detection from Point Clouds](https://arxiv.org/abs/1812.05784)
## 模型结构
## 算法原理
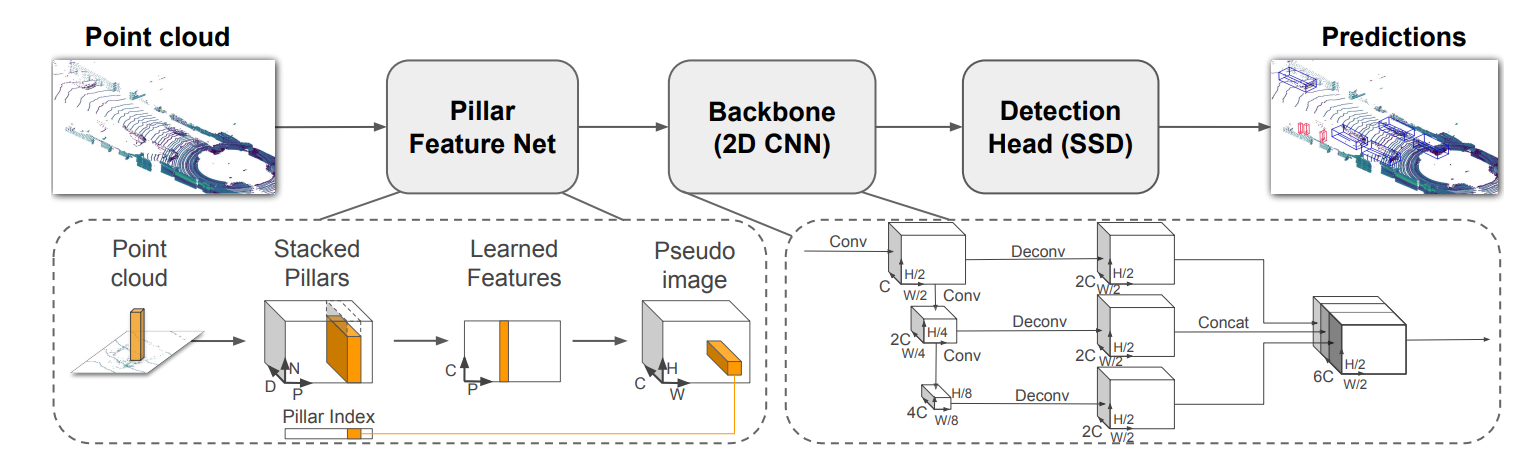
本文提出的PointPillars是一种针对3D目标检测任务的新型点云编码器和网络结构。它采用PointNets来学习点云的垂直柱状特征表示,从而更好地捕捉点云信息,并将其应用于标准的2D卷积检测架构中。PointPillars的设计使得可以根据需要进行速度和精度之间的权衡,同时在保持高精度的同时可以实现超过100Hz的速度。
具体来说,PointPillars采用了三个块来构建网络结构,每个块都包括 Upsampling 步骤和 Concatenation 步骤。这些步骤使特征向量的维度逐渐增加,以便于后续的目标检测任务。此外,PointPillars还使用了一些损失函数来优化网络参数,如SmoothL1损失、Focal损失等。
## 环境配置
`-v 路径`、`docker_name`和`imageID`根据实际情况修改
### 硬件需求
DCU型号:K100AI
节点数量:1
卡数:1
### Docker(方法一)
```bash
docker pull image.sourcefind.cn:5000/dcu/admin/base/pytorch:2.4.1-ubuntu22.04-dtk25.04-py3.10
docker run -it --shm-size 200g --network=host --name {docker_name} --privileged --device=/dev/kfd --device=/dev/dri --device=/dev/mkfd --group-add video --cap-add=SYS_PTRACE --security-opt seccomp=unconfined -u root -v /path/your_code_data/:/path/your_code_data/ -v /opt/hyhal/:/opt/hyhal/:ro {imageID} bash
cd /your_code_path/pointpillars-pytorch
pip install -r requirements.txt
```
### Dockerfile(方法二)
```bash
cd docker
docker build --no-cache -t pointpillars:latest .
docker run -it --shm-size 200g --network=host --name {docker_name} --privileged --device=/dev/kfd --device=/dev/dri --device=/dev/mkfd --group-add video --cap-add=SYS_PTRACE --security-opt seccomp=unconfined -u root -v /path/your_code_data/:/path/your_code_data/ -v /opt/hyhal/:/opt/hyhal/:ro {imageID} bash
cd /your_code_path/pointpillars-pytorch
pip install -r requirements.txt
```
### Anaconda(方法三)
关于本项目DCU显卡所需的特殊深度学习库可从[光合](https://developer.sourcefind.cn/tool/)开发者社区下载安装。
```bash
DTK: 25.04
python: 3.10
vllm: 0.8.5
torch: 2.4.1+das.opt2.dtk2504
deepspeed: 0.14.2+das.opt2.dtk2504
```
`Tips:以上dtk驱动、python、torch等DCU相关工具版本需要严格一一对应`
其它非深度学习库安装方式如下:
```bash
cd /your_code_path/pointpillars-pytorch
pip install -r requirements.txt
```
安装pointpillars
```bash
cd /your_code_path/pointpillars-pytorch
python setup.py build_ext --inplace
pip install .
```
## 数据集
1、下载数据集[point cloud](https://s3.eu-central-1.amazonaws.com/avg-kitti/data_object_velodyne.zip)(29GB), [images](https://s3.eu-central-1.amazonaws.com/avg-kitti/data_object_image_2.zip)(12 GB), [calibration files](https://s3.eu-central-1.amazonaws.com/avg-kitti/data_object_calib.zip)(16 MB)和[labels](https://s3.eu-central-1.amazonaws.com/avg-kitti/data_object_label_2.zip)(5 MB)。
解压后数据格式如下所示:
```
kitti
|- training
|- calib (#7481 .txt)
|- image_2 (#7481 .png)
|- label_2 (#7481 .txt)
|- velodyne (#7481 .bin)
|- testing
|- calib (#7518 .txt)
|- image_2 (#7518 .png)
|- velodyne (#7518 .bin)
```
2、制作数据集:
```bash
cd /your_code_path/pointpillars-pytorch
python pre_process_kitti.py --data_root your_path_to_kitti
```
制作完数据结构如下所示
```
kitti
|- training
|- calib (#7481 .txt)
|- image_2 (#7481 .png)
|- label_2 (#7481 .txt)
|- velodyne (#7481 .bin)
|- velodyne_reduced (#7481 .bin)
|- testing
|- calib (#7518 .txt)
|- image_2 (#7518 .png)
|- velodyne (#7518 .bin)
|- velodyne_reduced (#7518 .bin)
|- kitti_gt_database (# 19700 .bin)
|- kitti_infos_train.pkl
|- kitti_infos_val.pkl
|- kitti_infos_trainval.pkl
|- kitti_infos_test.pkl
|- kitti_dbinfos_train.pkl
```
## 训练
```
cd /your_code_path/pointpillars-pytorch
python train.py --data_root your_path_to_kitti
```
## 推理
- 从官方下载权重:https://github.com/zhulf0804/PointPillars/tree/main/pretrained
```
cd /your_code_path/pointpillars-pytorch
python evaluate.py --ckpt pretrained/epoch_160.pth --data_root your_path_to_kitti
```
- 自己训练的权重:
```
cd /your_code_path/pointpillars-pytorch
python evaluate.py --ckpt ./pillar_logs/checkpoints/epoch_160.pth --data_root your_path_to_kitti
```
## result
### 精度
```
与NV基本一致,部分精度高于NV
==========BBOX_2D==========
Pedestrian AP@0.5: 65.2719 61.7278 58.0838
Cyclist AP@0.5: 87.5932 75.1039 71.6308
Car AP@0.7: 90.7070 89.4133 86.6231
==========AOS==========
Pedestrian AOS@0.5: 45.5449 43.3262 40.6216
Cyclist AOS@0.5: 87.2105 72.7019 69.1393
Car AOS@0.7: 90.6199 88.9817 85.9057
==========BBOX_BEV==========
Pedestrian AP@0.5: 59.7484 55.0461 50.7703
Cyclist AP@0.5: 84.4216 68.7483 64.2096
Car AP@0.7: 90.1521 87.5884 85.7974
==========BBOX_3D==========
Pedestrian AP@0.5: 51.5879 46.5993 43.3320
Cyclist AP@0.5: 80.9012 62.8649 60.4813
Car AP@0.7: 86.0721 76.7700 74.3576
==========Overall==========
bbox_2d AP: 81.1907 75.4150 72.1126
AOS AP: 74.4584 68.3366 65.2222
bbox_bev AP: 78.1073 70.4609 66.9258
bbox_3d AP: 72.8538 62.0781 59.3903
```
NV精度
| Repo | Metric | Overall | Pedestrian | Cyclist | Car |
| :---: | :---: | :---: | :---: | :---: | :---: |
| this repo | 3D-BBox | 73.3259 62.7834 59.6278 | 51.4642 47.9446 43.8040 | 81.8677 63.6617 60.9126 | 86.6456 76.7439 74.1668 |
| [mmdet3d v0.18.1](https://github.com/open-mmlab/mmdetection3d/tree/v0.18.1) | 3D-BBox | 72.0537, 60.1114, 55.8320 | 52.0263, 46.4037, 42.4841 | 78.7231, 59.9526, 57.2489 | 85.4118, 73.9780, 67.7630 |
| this repo | BEV | 77.8540 69.8003 66.6699 | 59.1687 54.3456 50.5023 | 84.4268 67.1409 63.7409 | 89.9664 87.9145 85.7664 |
| [mmdet3d v0.18.1](https://github.com/open-mmlab/mmdetection3d/tree/v0.18.1) | BEV | 76.6485, 67.7609, 64.5605 | 59.0778, 53.3638, 48.4230 | 80.9328, 63.3447, 60.0618 | 89.9348, 86.5743, 85.1967 |
| this repo | 2D-BBox | 80.5097 74.6120 71.4758 | 64.6249 61.4201 57.5965 | 86.2569 73.0828 70.1726 | 90.6471 89.3330 86.6583 |
| [mmdet3d v0.18.1](https://github.com/open-mmlab/mmdetection3d/tree/v0.18.1) | 2D-BBox | 78.4938, 73.4781, 70.3613 | 62.2413, 58.9157, 55.3660 | 82.6460, 72.3547, 68.4669 | 90.5939, 89.1638, 87.2511 |
| this repo | AOS | 74.9647 68.1712 65.2817 | 49.3777 46.7284 43.8352 | 85.0412 69.1024 66.2801 | 90.4752 88.6828 85.7298 |
| [mmdet3d v0.18.1](https://github.com/open-mmlab/mmdetection3d/tree/v0.18.1) | AOS | 72.41, 66.23, 63.55 | 46.00, 43.22, 40.94 | 80.85, 67.20, 63.63 | 90.37, 88.27, 86.07 |
## 应用场景
### 算法类别
计算机视觉
### 热点应用行业
自动驾驶,目标检测,交通
## 预训练权重下载
- https://github.com/zhulf0804/PointPillars/tree/main/pretrained
## 源码仓库及问题反馈
- https://developer.sourcefind.cn/codes/modelzoo/pointpillars-pytorch
## 参考资料
- https://github.com/zhulf0804/PointPillars