# Painter
## 论文
[Images Speak in Images: A Generalist Painter for In-Context Visual Learning](https://arxiv.org/abs/2212.02499)
## 模型结构
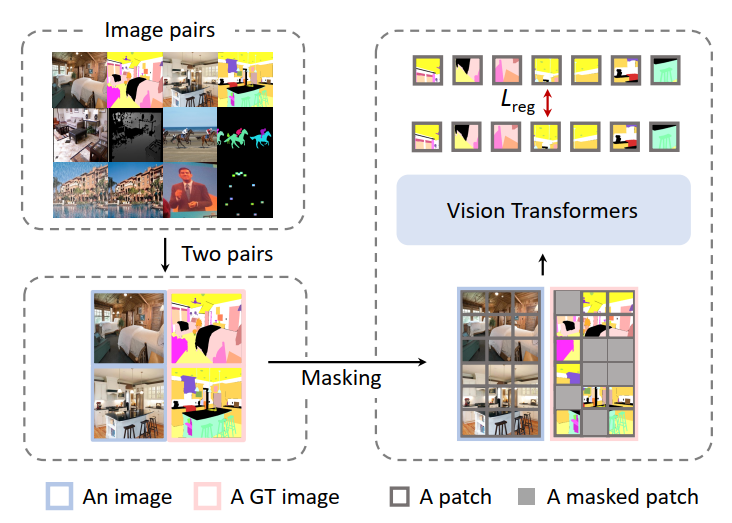
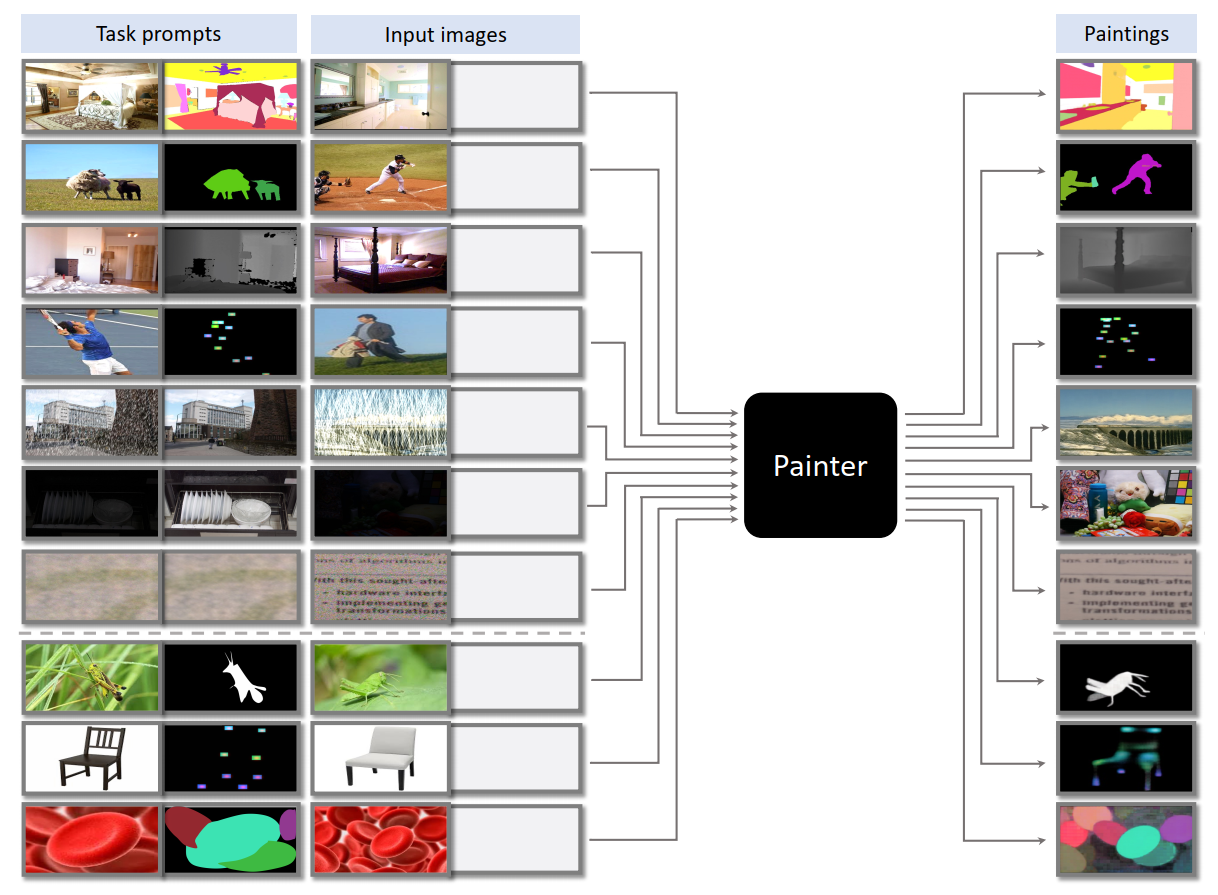
## 算法原理
将视觉任务的连续输出空间离散化, 并使用语言或专门设计的离散标记作为任务提示, 将视觉问题转化为 NLP 问题.
## 环境配置
Tips: timm==0.3.2 版本存在 [cannot import name 'container_abcs' from 'torch._six'](https://github.com/huggingface/pytorch-image-models/issues/420#issuecomment-776459842) 问题, 需要将 timm/models/layers/helpers.py 中 from torch._six import container_abcs 修改为
```bash
import torch
TORCH_MAJOR = int(torch.__version__.split('.')[0])
TORCH_MINOR = int(torch.__version__.split('.')[1])
if TORCH_MAJOR == 1 and TORCH_MINOR < 8:
from torch._six import container_abcs
else:
import collections.abc as container_abcs
```
### Docker(方法一)
-v 路径、docker_name和imageID根据实际情况修改
```bash
docker pull image.sourcefind.cn:5000/dcu/admin/base/pytorch:1.13.1-centos7.6-dtk-23.04.1-py38-latest
docker run -it -v /path/your_code_data/:/path/your_code_data/ --shm-size=32G --privileged=true --device=/dev/kfd --device=/dev/dri/ --group-add video --name docker_name imageID bash
cd /your_code_path/painter_pytorch
pip install --upgrade setuptools wheel
pip install -r requirements.txt
# 安装detectron2
git clone https://github.com/facebookresearch/detectron2
python -m pip install -e detectron2
```
### Dockerfile(方法二)
-v 路径、docker_name和imageID根据实际情况修改
```bash
cd ./docker
cp ../requirements.txt requirements.txt
docker build --no-cache -t painter:latest .
docker run -it -v /path/your_code_data/:/path/your_code_data/ --shm-size=32G --privileged=true --device=/dev/kfd --device=/dev/dri/ --group-add video --name docker_name imageID bash
cd /your_code_path/painter_pytorch
pip install --upgrade setuptools wheel
pip install -r requirements.txt
# 安装detectron2
git clone https://github.com/facebookresearch/detectron2
python -m pip install -e detectron2
```
### Anaconda(方法三)
1、关于本项目DCU显卡所需的特殊深度学习库可从光合开发者社区下载安装: https://developer.hpccube.com/tool/
```
DTK软件栈:dtk23.04.1
python:python3.8
torch:1.13.1
torchvision:0.14.1
```
Tips:以上dtk软件栈、python、torch等DCU相关工具版本需要严格一一对应
2、其他非特殊库直接按照requirements.txt安装
```bash
pip install --upgrade setuptools wheel
pip install -r requirements.txt
# 安装detectron2
git clone https://github.com/facebookresearch/detectron2
python -m pip install -e detectron2
```
## 数据集
本项目所需数据集较多, 所以提供了项目数据集需求较多, 可以使用提供的[a toy training dataset](https://huggingface.co/BAAI/Painter/blob/main/toy_datasets.tar)数据集来验证部分功能, 数据集由每个类别中各10个类别组成. 将数据集放置于 `$Painter_ROOT/toy_datasets` 路径下, 并设置`$Painter_ROOT/train_painter_vit_large.sh` 中 `DATA_PATH=toy_datasets`即可, 其他参数请参考训练章节的介绍.
如需完整数据集, 请参考[data instructions](docs/DATA.md).
完整数据集的目录结构如下:
```
├── nyu_depth_v2/
│ ├── sync/
│ ├── official_splits/
│ ├── nyu_depth_v2_labeled.mat
│ ├── nyuv2_sync_image_depth.json # 生成
│ ├── nyuv2_test_image_depth.json # 生成
├── ade20k/
│ ├── images/
│ ├── annotations/
│ ├── annotations_detectron2/ # 生成
│ ├── annotations_with_color/ # 生成
│ ├── ade20k_training_image_semantic.json # 生成
│ ├── ade20k_validation_image_semantic.json # 生成
├── ADEChallengeData2016/ # sim-link to $Painter_ROOT/datasets/ade20k
├── coco/
│ ├── train2017/
│ ├── val2017/
│ ├── annotations/
│ ├── instances_train2017.json
│ ├── instances_val2017.json
│ ├── person_keypoints_val2017.json
│ ├── panoptic_train2017.json
│ ├── panoptic_val2017.json
│ ├── panoptic_train2017/
│ ├── panoptic_val2017/
│ ├── panoptic_semseg_val2017/ # 生成
│ ├── panoptic_val2017/ # sim-link to $Painter_ROOT/datasets/coco/annotations/panoptic_val2017
│ ├── pano_sem_seg/ # 生成
│ ├── panoptic_segm_train2017_with_color
│ ├── panoptic_segm_val2017_with_color
│ ├── coco_train2017_image_panoptic_sem_seg.json
│ ├── coco_val2017_image_panoptic_sem_seg.json
│ ├── pano_ca_inst/ # 生成
│ ├── train_aug0/
│ ├── train_aug1/
│ ├── ...
│ ├── train_aug29/
│ ├── train_org/
│ ├── train_flip/
│ ├── val_org/
│ ├── coco_train_image_panoptic_inst.json
│ ├── coco_val_image_panoptic_inst.json
├── coco_pose/
│ ├── person_detection_results/
│ ├── COCO_val2017_detections_AP_H_56_person.json
│ ├── data_pair/ # 生成
│ ├── train_256x192_aug0/
│ ├── train_256x192_aug1/
│ ├── ...
│ ├── train_256x192_aug19/
│ ├── val_256x192/
│ ├── test_256x192/
│ ├── test_256x192_flip/
│ ├── coco_pose_256x192_train.json # 生成
│ ├── coco_pose_256x192_val.json # 生成
├── derain/
│ ├── train/
│ ├── input/
│ ├── target/
│ ├── test/
│ ├── Rain100H/
│ ├── Rain100L/
│ ├── Test100/
│ ├── Test1200/
│ ├── Test2800/
│ ├── derain_train.json
│ ├── derain_test_rain100h.json
├── denoise/
│ ├── SIDD_Medium_Srgb/
│ ├── train/
│ ├── val/
│ ├── denoise_ssid_train.json # 生成
│ ├── denoise_ssid_val.json # 生成
├── light_enhance/
│ ├── our485/
│ ├── low/
│ ├── high/
│ ├── eval15/
│ ├── low/
│ ├── high/
│ ├── enhance_lol_train.json # 生成
│ ├── enhance_lol_val.json # 生成
```
## 训练
下载预训练模型 [MAE ViT-Large model ](https://dl.fbaipublicfiles.com/mae/pretrain/mae_pretrain_vit_large.pth), 修改 `$Painter_ROOT/train.sh` 中finetune参数地址.
### 单机多卡
本项目默认参数是单机4卡 (total_bsz = 1x4x32 = 128), 如需使用其他的卡数, 请修改 train.sh 中对应参数.
```bash
bash train.sh
```
### 多机多卡
Tips: 作者使用8个节点, 每个节点8张卡 (total_bsz = 8x8x32 = 2048) 进行的训练;
```bash
bash run_train_multi.sh
```
## 推理
1. 下载推理模型[🤗 Hugging Face Models](https://huggingface.co/BAAI/Painter/blob/main/painter_vit_large.pth), 或者准备好自己的待测试模型
2. 部分测试无法使用toy_datasets进行验证,如果使用toy_datasets数据集进行推理, 需确认默认图片是否存在, 如不存在请修改对应参数, 如
`eval/nyuv2_depth/eval.sh` 中的 `PROMPT="study_room_0005b/rgb_00094"`, rgb_00094图片不存在于toy_datasets数据集中,请对应修改为toy_datasets中的图片名,如`PROMPT="study_room_0005b/rgb_00092"`
各个数据集推理方法如下:
### NYU Depth V2
设置 `$Painter_ROOT/eval/nyuv2_depth/eval.sh` 文件里的 `JOB_NAME`、`PROMPT`、`CKPT_FILE` 和 `DATA_DIR` 参数:
```bash
bash eval/nyuv2_depth/eval.sh
```
### ADE20k Semantic Segmentation
1. 无法使用toy_datasets进行验证;
2. 设置 `$Painter_ROOT/eval/ade20k_semantic/eval.sh` 文件里的 `JOB_NAME`、`PROMPT` 参数, 执行下面的命令:
```bash
bash eval/ade20k_semantic/eval.sh
```
### COCO Panoptic Segmentation
1. 无法使用toy_datasets进行验证;
2. 设置 `$Painter_ROOT/eval/coco_panoptic/eval.sh` 文件里的 `JOB_NAME`、`PROMPT` 参数, 然后执行下面的命令:
```bash
bash eval/coco_panoptic/eval.sh
```
### COCO Human Pose Estimation
1. 无法使用toy_datasets进行验证;
2. 生成验证所需的图像:
```bash
python -m torch.distributed.launch --nproc_per_node=4 --master_port=29500 --use_env eval/mmpose_custom/painter_inference_pose.py --ckpt_path models/painter_vit_large/painter_vit_large.pth
python -m torch.distributed.launch --nproc_per_node=4 --master_port=29500 --use_env eval/mmpose_custom/painter_inference_pose.py --ckpt_path models/painter_vit_large/painter_vit_large.pth --flip_test
```
3. 修改 `$Painter_ROOT/eval/mmpose_custom/configs/coco_256x192_test_offline.py` 文件中的 `job_name`、`data_root`、`bbox_file` 和 `ckpt_file` 参数, 执行:
```bash
cd $Painter_ROOT/eval/mmpose_custom
./tools/dist_test.sh configs/coco_256x192_test_offline.py none 1 --eval mAP
```
### Low-Light Image Enhancement
执行
```bash
python eval/lol/painter_inference_lol.py --ckpt_path models/path/of/painter_vit_large.pth --data_dir path/of/datasets
Example:
python eval/lol/painter_inference_lol.py --ckpt_path models/painter_vit_large.pth --data_dir datasets
```
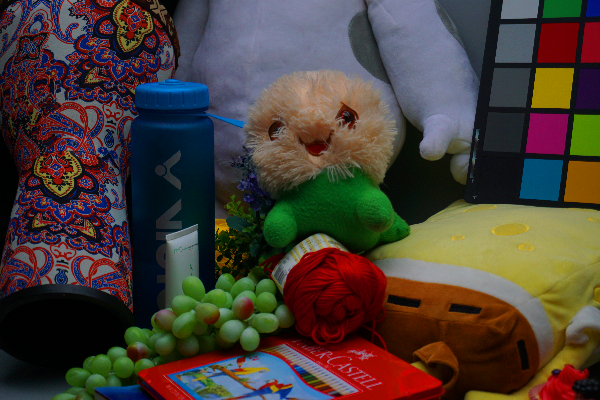
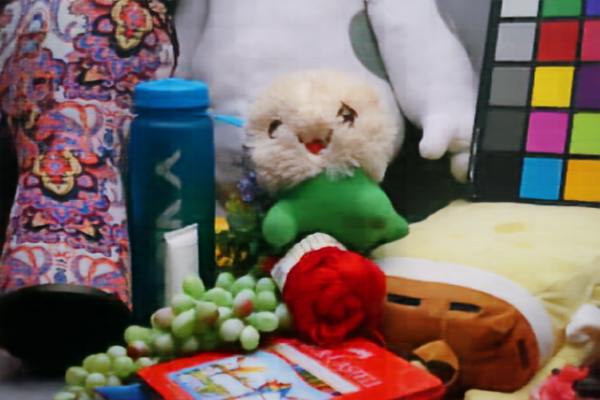
## result
三张图从左到右分别为: 原始图像, 低分辨率图像, 经模型超分处理后的图像.
### 精度
基于项目提供的测试数据, 得到单卡测试结果如下:
| enhance | datasets | PSNR | SSIM |
| :------: | :------: | :------: | :------: |
| ours | LOL | 22.34 | 0.8716 |
| paper | LOL | 22.34 | 0.872 |
## 应用场景
### 算法类别
图像超分,图像分割
### 热点应用行业
交通,医疗,政府,制造
## 源码仓库及问题反馈
http://developer.hpccube.com/codes/modelzoo/painter_pytorch.git
## 参考资料
https://github.com/baaivision/Painter/tree/main/Painter