# InstructBLIP
## 论文
- https://arxiv.org/pdf/2305.06500
## 模型结构
InstructBLIP是BLIP系列的最新模型,将LLM领域的指令微调技术应用到视觉语言多模态领域中,在多项视觉和语言任务取得SOTA。BLIP系列模型包含原始的BLIP模型、BLIP2以及本项目的InstrutBLIP。
## 算法原理
BLIP(Bootstrapping Language-Image Pretraining)是salesforce在2022年提出的多模态框架,是理解和生成的统一,引入了跨模态的编码器和解码器,实现了跨模态信息流动。相比于CLIP使用image encoder和txt encoder两个独立的模块分别对图像和文本进行编码将输入投影到潜在向量空间中,BLIP的创新点在于引入了编码器-解码器的多模态混合结构MED( Multimodal mixture of Encoder-Decoder),能够有效地进行多任务预学习和迁移学习。MED包括两个单模态编码器(lmage Encoder,Text Encoder),一个以图像为基础的文本编码器(image-grounded text encoder)和一个以图像为基础的文本解码器(image-grounded text decoder),并设计了三类损失联合优化:

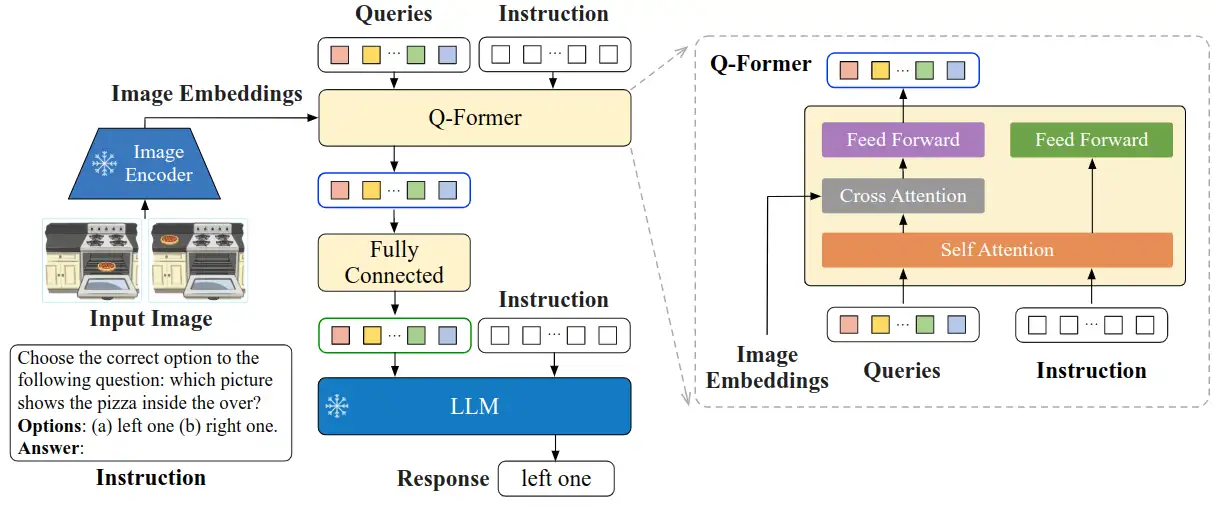
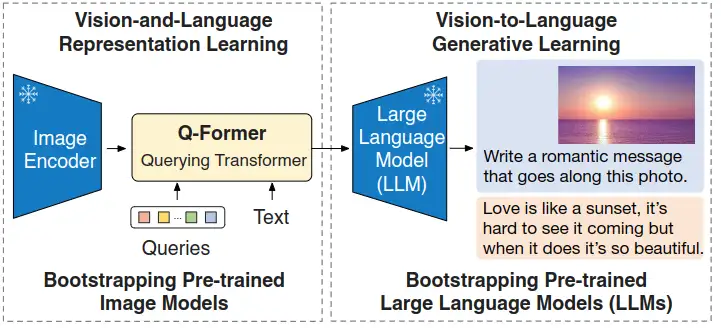
与ALBEF、BLIP类似,BLIP-2的目标是训练一个图文多模态预训练模型。不同点是,BLIP-2是在冻结图像编码器和文本编码器的情况下,训练出多模态预训练模型。这给BLIP-2带来了巨大优势,也是其最大的创新点。为了让图像和文本产生交互,BLIP2设计了Q-Former模块来对图文进行对齐:
InstructBLIP 的架构和 BLIP-2 相似,从预训练好的 BLIP-2 模型初始化,由图像编码器、LLM 和 Q-Former 组成。在指令微调期间只训练 Q-Former,冻结图像编码器和 LLM 的参数。
## 环境配置
### Docker(方法一)
从[光源](https://www.sourcefind.cn/#/service-list)中拉取docker镜像:
```
docker pull image.sourcefind.cn:5000/dcu/admin/base/pytorch:2.1.0-ubuntu20.04-dtk24.04.1-py3.8
```
创建容器并挂载目录进行开发:
```
docker run -it --name {name} --shm-size=1024G --device=/dev/kfd --device=/dev/dri/ --privileged --cap-add=SYS_PTRACE --security-opt seccomp=unconfined --ulimit memlock=-1:-1 --ipc=host --network host --group-add video -v /opt/hyhal:/opt/hyhal:ro -v {}:{} {docker_image} /bin/bash
# 修改1 {name} 需要改为自定义名称,建议命名{框架_dtk版本_使用者姓名},如果有特殊用途可在命名框架前添加命名
# 修改2 {docker_image} 需要需要创建容器的对应镜像名称,如: image.sourcefind.cn:5000/dcu/admin/base/pytorch:2.1.0-ubuntu20.04-dtk24.04.1-py3.8
# 修改3 -v 挂载路径到容器指定路径
pip install -r requirements.txt
```
### Dockerfile(方法二)
```
cd docker
docker build --no-cache -t InstrutBLIP_pytorch:1.0 .
docker run -it --name {name} --shm-size=1024G --device=/dev/kfd --device=/dev/dri/ --privileged --cap-add=SYS_PTRACE --security-opt seccomp=unconfined --ulimit memlock=-1:-1 --ipc=host --network host --group-add video -v /opt/hyhal:/opt/hyhal:ro -v {}:{} {docker_image} /bin/bash
pip install -r requirements.txt
```
### Anaconda(方法三)
线上节点推荐使用conda进行环境配置。
创建python=3.8的conda环境并激活
```
conda create -n InstrutBLIP python=3.8
conda activate InstrutBLIP
```
关于本项目DCU显卡所需的特殊深度学习库可从[光合](https://developer.hpccube.com/tool/)开发者社区下载安装。
```
DTK驱动:dtk24.04.1
python:python3.8
pytorch:2.1.0
torchvision:0.16.0
```
安装其他依赖包
```
pip install -r requirements.txt
# 项目需要从huggingface中自动下载部分模型,需要使用huggingface镜像
pip install -U huggingface_hub
export HF_ENDPOINT=https://hf-mirror.com
```
## 数据集
下载[ScienceQA](https://huggingface.co/datasets/derek-thomas/ScienceQA/tree/main)数据集
SCNet快速下载链接:
- http://113.200.138.88:18080/aidatasets/project-dependency/scienceqa
数据集结构为:
input
├── scienceqa
│ ├── images
│ │ ├── train
│ │ ├── test
│ │ ├── val
│ ├── scienceqa_problems_path.json
│ ├── scienceqa_pid_splits.json
对ScienceQA进行预处理:
```
# 修改预处理代码中scienceqa数据路径为数据解压位置,上面的数据结构将数据解压至input文件夹中
python scienceqa_data_preprocess.py
```
运行该命令后会在/input/scienceqa/目录下生成scienceqa_train.json、scienceqa_test.json、scienceqa_val.json文件
该命令将scienceQA转为指令微调数据集,指令格式为:
```
Context: { {hint} {lecture} } Question: { {question} } Options: { {choices} } Answer: (a) { {answer} }
```
## 训练
使用预训练权重[vicuna-7b-v1.1](https://huggingface.co/lmsys/vicuna-7b-v1.1)或者[vicuna-13b-v1.1](https://huggingface.co/lmsys/vicuna-13b-v1.1)进行LoRA微调
SCNet vicuna-7b-v1.1快速下载链接:
- http://113.200.138.88:18080/aimodels/findsource-dependency/minigpt-4
SCNet vicuna-13b-v1.1快速下载链接:
- http://113.200.138.88:18080/aimodels/findsource-dependency/vicuna-13b-v1.1
修改lavis/config/datasets/scienceqa/default.yaml的数据集路径
开始训练:
```
# scienceqa为指定数据集,60为实验序号,对应于config文件:lavis/projects/instructblip/train/scienceqa/finetune_instructblip_scienceqa_60.yaml
bash run_scripts/instructblip/train/run_finetune_instructblip_experiments.sh scienceqa 60
```
## 推理
- 下载LLM模型vicuna-7b或者vicuna-13b
[vicuna-7b-v1.1](https://huggingface.co/lmsys/vicuna-7b-v1.1)
[vicuna-13b-v1.1](https://huggingface.co/lmsys/vicuna-13b-v1.1)
- 下载instructBLIP模型instruct_blip_vicuna7b或者instruct_blip_vicuna13b
[instruct_blip_vicuna7b_trimmed](https://storage.googleapis.com/sfr-vision-language-research/LAVIS/models/InstructBLIP/instruct_blip_vicuna7b_trimmed.pth)
[instruct_blip_vicuna13b_trimmed](https://storage.googleapis.com/sfr-vision-language-research/LAVIS/models/InstructBLIP/instruct_blip_vicuna13b_trimmed.pth)
修改lavis/configs/models/blip2/blip2_instruct_vicuna7b.yaml和blip2_instruct_vicuna13b.yaml中预训练模型pretrained和llm_model的本地位置:
```
pretrained: "/mnt/LAVIS-main/instruct_blip_vicuna7b_trimmed.pth"
llm_model: "/mnt/LAVIS-main/vicuna-7b-v1.1"
```
运行推理代码,自动下载一些预训练模型后会在命令行输出一个本地URL链接,点击链接就可以进入webUI界面:
```
python projects/instructblip/run_demo.py
```
## result
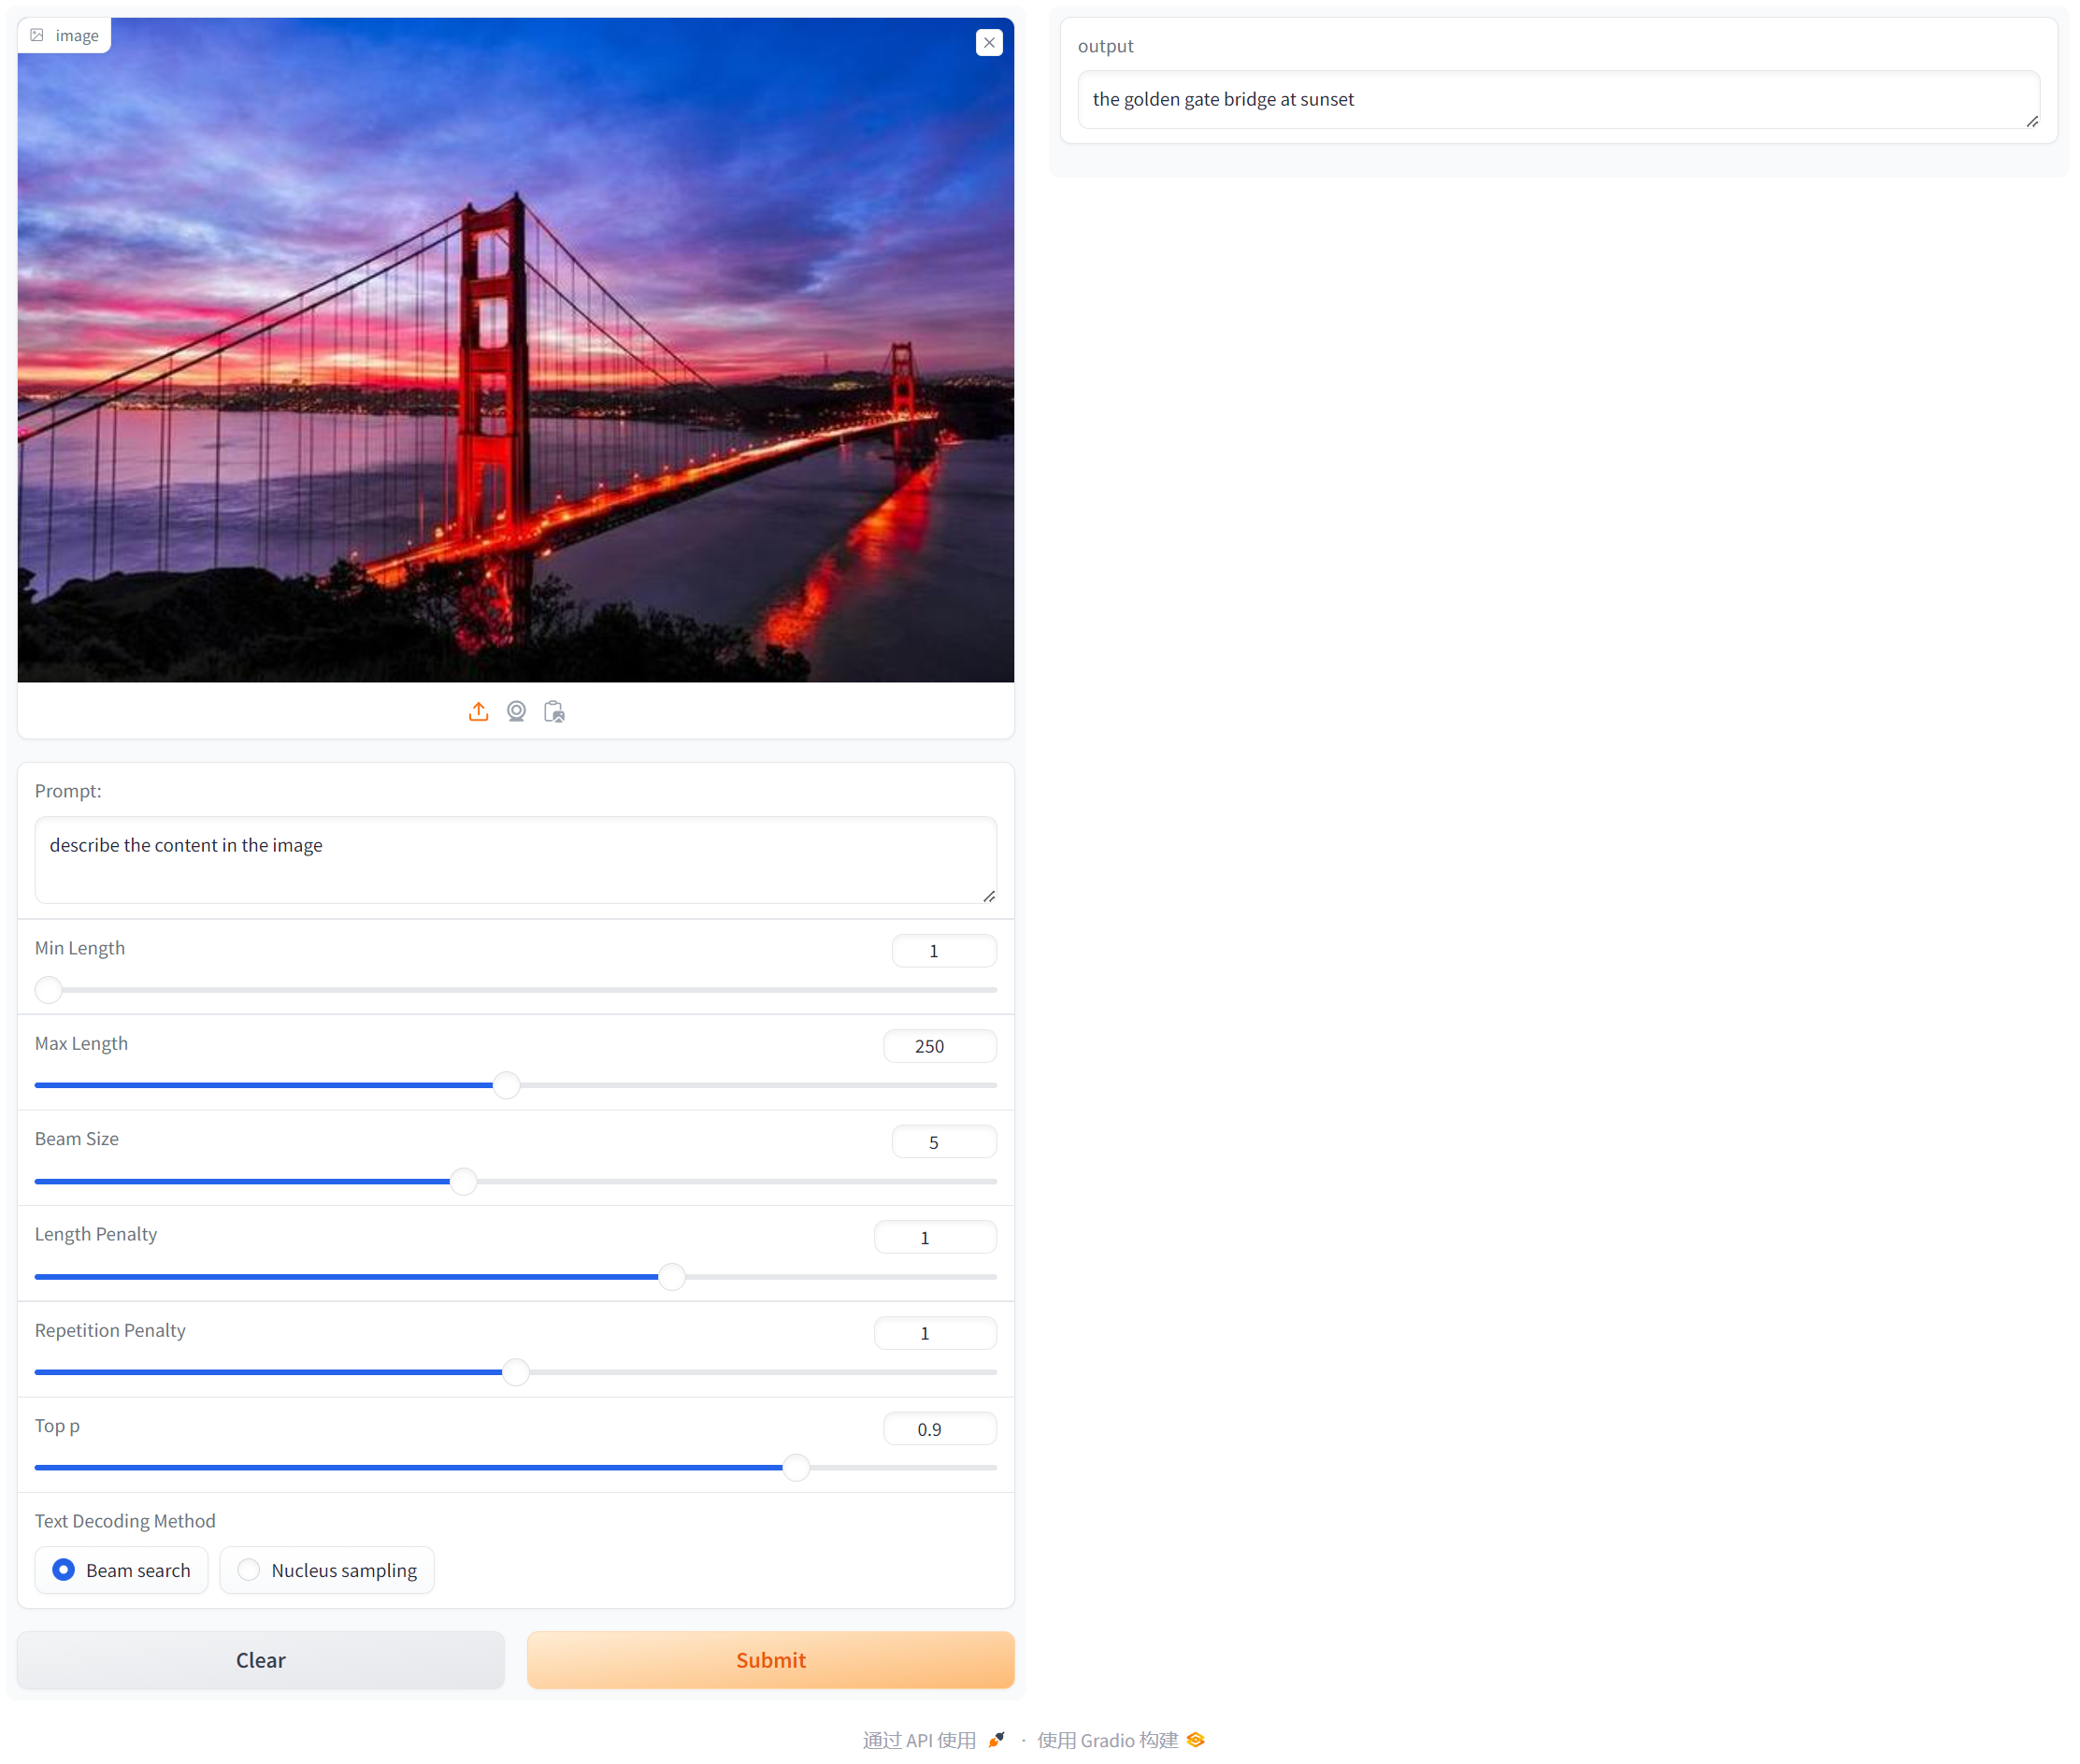
使用gradio搭建可视化界面,首先上传图像,然后输入Prompt提示词后点击Submit,在右侧output会输出文本对应的描述:
如果gradio显示缺少frpc_linux_amd64_v0.2文件,下载[frpc_linux_amd64_v0.2](https://gitcode.net/miamnh/frpc_linux_amd64/-/blob/master/frpc_linux_amd64_v0.2)将文件放入对应gradio位置,并使用chmod +x修改文件权限
## 精度
无
## 应用场景
### 算法类别
文生图
### 热点应用行业
AIGC,设计,教育
## 源码仓库及问题反馈
[https://developer.sourcefind.cn/codes/modelzoo/instructBLIP_pytorch](https://developer.sourcefind.cn/codes/modelzoo/instructBLIP_pytorch)
## 参考资料
[https://github.com/salesforce/LAVIS/tree/main](https://github.com/salesforce/LAVIS/tree/main)
[https://github.com/AttentionX/InstructBLIP_PEFT](https://github.com/AttentionX/InstructBLIP_PEFT)