# DiffusionDet
## 论文
`DiffusionDet: Diffusion Model for Object Detection`
- https://arxiv.org/abs/2211.09788
## 模型结构
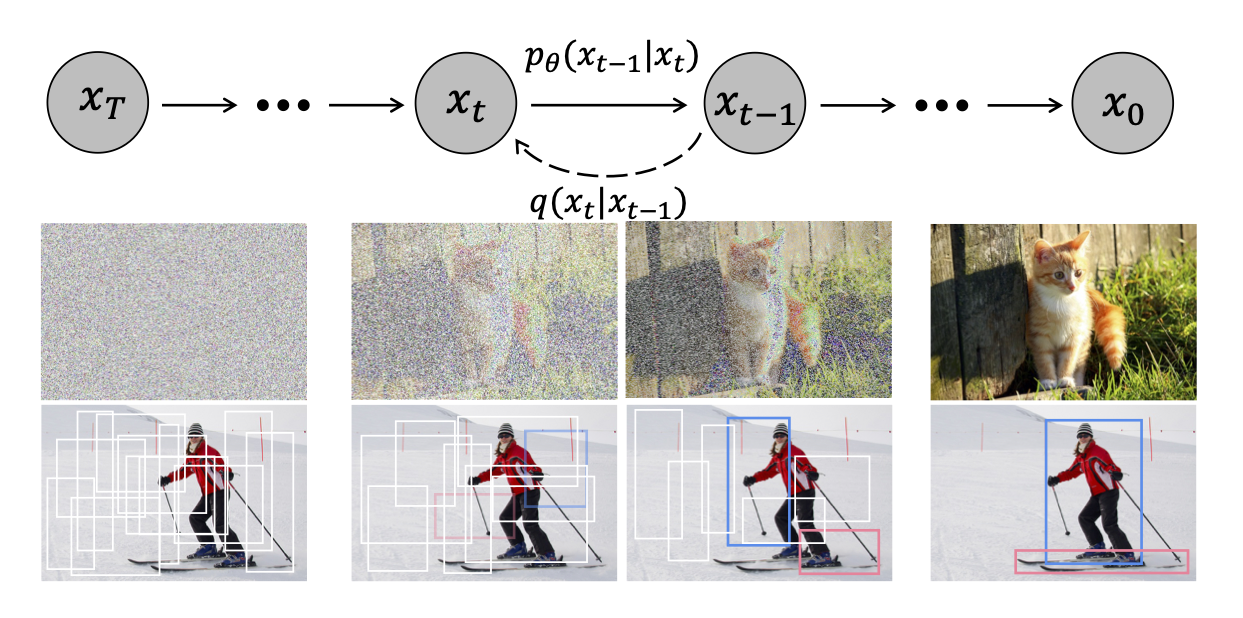
扩散模型在许多生成任务中取得了巨大成功,开始在感知任务如图像分割中进行探索。然而,据作者所知,尚无成功将其应用于目标检测的先例。
DiffusionDet是一种新框架,它将目标检测表述为从噪声框到目标框的去噪扩散过程。
## 算法原理
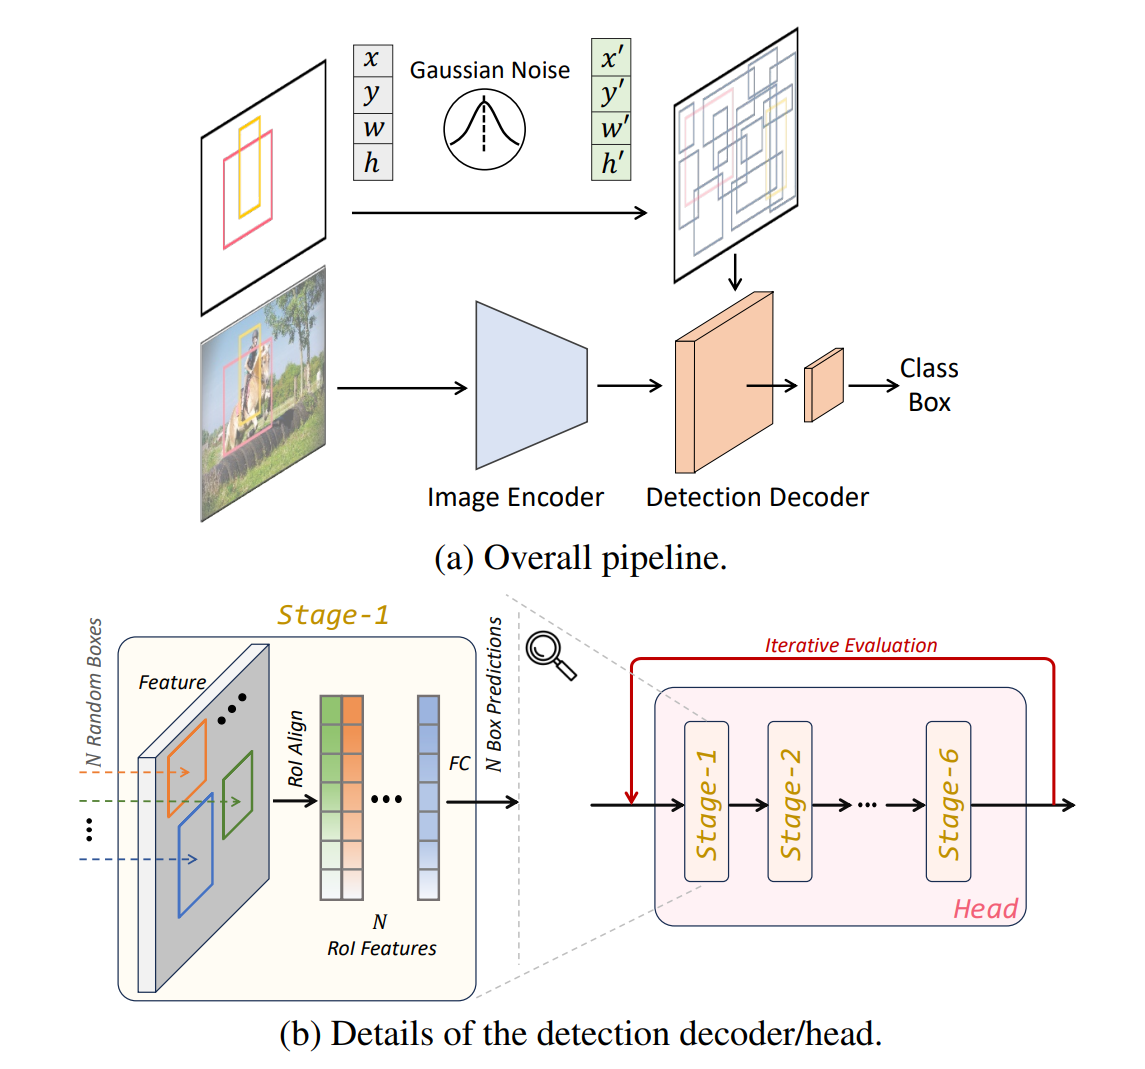
DiffusionDet框架如下图。(a) 图像编码器从输入图像中提取特征表示。检测解码器以带噪声的框为输入,预测类别分类和框坐标。
(b) 检测解码器在一个检测头部有 6 个阶段,遵循了 DETR 和 Sparse R-CNN 的设计。此外,DiffusionDet 可以多次重用这个检测头部(包含 6 个阶段),这被称为“迭代评估”。
## 环境配置
### Docker(方法一)
此处提供[光源](https://www.sourcefind.cn/#/service-details)拉取docker镜像的地址与使用步骤,以及[光合](https://developer.hpccube.com/tool/)开发者社区深度学习库下载地址
```
docker pull image.sourcefind.cn:5000/dcu/admin/base/pytorch:2.1.0-centos7.6-dtk24.04-py310
docker run -it --shm-size=128G -v /path/your_code_data/:/path/your_code_data/ -v /opt/hyhal:/opt/hyhal:ro --privileged=true --device=/dev/kfd --device=/dev/dri/ --group-add video --name diffusiondet_pytorch bash # 为以上拉取的docker的镜像ID替换,本镜像为:c85ed27005f2
cd /path/your_code_data/diffusiondet_pytorch
pip install mmcv-2.0.1_das1.0+gitc0ccf15.abi0.dtk2404.torch2.1.-cp310-cp310-manylinux2014_x86_64.whl
pip install wheel -i https://mirrors.aliyun.com/pypi/simple/ --trusted-host mirrors.aliyun.com --no-deps
pip install timm -i https://mirrors.aliyun.com/pypi/simple/ --trusted-host mirrors.aliyun.com
pip install lvis -i https://mirrors.aliyun.com/pypi/simple/ --trusted-host mirrors.aliyun.com
git clone https://github.com/facebookresearch/detectron2.git
cd detectron2
pip install e . --no-build-isolation -i https://mirrors.aliyun.com/pypi/simple/ --trusted-host mirrors.aliyun.com
```
### Dockerfile(方法二)
此处提供dockerfile的使用方法
```
docker build --no-cache -t diffusiondet:latest .
docker run -it --shm-size=128G -v /path/your_code_data/:/path/your_code_data/ -v /opt/hyhal:/opt/hyhal:ro --privileged=true --device=/dev/kfd --device=/dev/dri/ --group-add video --name diffusiondet_pytorch diffusiondet bash
cd /path/your_code_data/diffusiondet_pytorch
pip install mmcv-2.0.1_das1.0+gitc0ccf15.abi0.dtk2404.torch2.1.-cp310-cp310-manylinux2014_x86_64.whl
pip install wheel -i https://mirrors.aliyun.com/pypi/simple/ --trusted-host mirrors.aliyun.com --no-deps
pip install timm -i https://mirrors.aliyun.com/pypi/simple/ --trusted-host mirrors.aliyun.com
pip install lvis -i https://mirrors.aliyun.com/pypi/simple/ --trusted-host mirrors.aliyun.com
git clone https://github.com/facebookresearch/detectron2.git
cd detectron2
pip install e . --no-build-isolation -i https://mirrors.aliyun.com/pypi/simple/ --trusted-host mirrors.aliyun.com
```
### Anaconda(方法三)
此处提供本地配置、编译的详细步骤,例如:
关于本项目DCU显卡所需的特殊深度学习库可从[光合](https://developer.hpccube.com/tool/)开发者社区下载安装。
```
#DTK驱动:dtk24.04
# python:python3.10
# torch: 2.1.0
# torchvision: 0.16.0
conda create -n diffusiondet python=3.10
conda activate diffusiondet
pip install torch-2.1.0+das1.0+git00661e0.abi0.dtk2404-cp310-cp310-manylinux2014_x86_64.whl
pip install torchvision-0.16.0+das1.0+gitc9e7141.abi0.dtk2404.torch2.1-cp310-cp310-manylinux2014_x86_64.whl
pip install mmcv-2.0.1_das1.0+gitc0ccf15.abi0.dtk2404.torch2.1.-cp310-cp310-manylinux2014_x86_64.whl
```
`Tips:以上dtk驱动、python、torch等DCU相关工具版本需要严格一一对应`
其它依赖环境安装如下:
```
cd /path/your_code_data/sed
git clone https://github.com/facebookresearch/detectron2.git
cd detectron2
pip install e . --no-build-isolation -i https://mirrors.aliyun.com/pypi/simple/ --trusted-host mirrors.aliyun.com
pip install timm -i https://mirrors.aliyun.com/pypi/simple/ --trusted-host mirrors.aliyun.com
pip install lvis -i https://mirrors.aliyun.com/pypi/simple/ --trusted-host mirrors.aliyun.com
```
## 数据集
dataset数据结构如下:
数据集SCNet快速下载链接
[coco](http://113.200.138.88:18080/aidatasets/coco2017)
[lvis](http://113.200.138.88:18080/aidatasets/lvis)
```
── dataset
│ ├── coco
│ │ ├── annotations
│ │ ├── train2017
│ │ └── val2017
│ ├── lvis
│ │ ├── lvis_v1_train.json
│ │ └── lvis_v1_val.json
```
数据准备详情查看dataset/readme.md。
## 训练
首先下载模型文件:
模型文件SCNet快速下载链接[pkl文件](http://113.200.138.88:18080/aimodels/diffusiondet_models)
下载后放于/path/your_code_data/diffusiondet_pytorch/文件夹下
```
mkdir models
cd models
# ResNet-101
wget https://github.com/ShoufaChen/DiffusionDet/releases/download/v0.1/torchvision-R-101.pkl
# Swin-Base
wget https://github.com/ShoufaChen/DiffusionDet/releases/download/v0.1/swin_base_patch4_window7_224_22k.pkl
cd ..
```
### 单机单卡
```
python train_net.py --config-file configs/diffdet.coco.res50.yaml
```
### 单机多卡
```
python train_net.py --num-gpus 4 --config-file configs/diffdet.coco.res50.yaml
```
## 推理
模型权重文件下载表格如下,放到weights文件夹下:
注意:模型配置文件、clip文件与权重文件应一一对应
### 单卡推理
Inference Demo
To save outputs to a directory , use --output
```
python demo.py --config-file configs/diffdet.coco.res50.yaml \
--input demo.jpg --opts MODEL.WEIGHTS diffdet_coco_res50.pth
```
Evaluate DiffusionDet
```
python train_net.py \
--config-file configs/diffdet.coco.res50.yaml \
--eval-only MODEL.WEIGHTS path/to/model.pth
```
### 多卡推理
```
python train_net.py --num-gpus 4 \
--config-file configs/diffdet.coco.res50.yaml \
--eval-only MODEL.WEIGHTS path/to/model.pth
#Evaluate with arbitrary number (e.g 300) of boxes by setting MODEL.DiffusionDet.NUM_PROPOSALS 300.
#Evaluate with 4 refinement steps by setting MODEL.DiffusionDet.SAMPLE_STEP 4.
```
## result
Inference Demo
### 精度
使用四张DCU-K100 AI卡推理
| Method | Box AP (1 step) | Box AP (4 step) |
|:------------------------------------------------------------------------------------:|:---------------:|------|
| [COCO-Res50](configs/diffdet.coco.res50.yaml) | 45.7 | 46.1 |
| [COCO-Res101](configs/diffdet.coco.res101.yaml) | 46.6 | 46.9 |
| [COCO-SwinBase](configs/diffdet.coco.swinbase.yaml) | 52.3 | 52.7 |
| [LVIS-Res50](configs/diffdet.lvis.res50.yaml) | 30.4 | 31.8 |
| [LVIS-Res101](configs/diffdet.lvis.res101.yaml) | 31.9 | 32.9 |
| [LVIS-SwinBase](configs/diffdet.lvis.swinbase.yaml) | 40.6 | 41.9|
## 应用场景
### 算法类别
`目标检测`
### 热点应用行业
`科研,制造,医疗,家居,教育`
## 源码仓库及问题反馈
- https://developer.hpccube.com/codes/modelzoo/diffusiondet-pytorch
## 参考资料
- https://github.com/ShoufaChen/DiffusionDet