# DeepSolo
## 论文
`DeepSolo: Let Transformer Decoder with Explicit Points Solo for Text Spotting`
- https://arxiv.org/abs/2211.10772
`DeepSolo++: Let Transformer Decoder with Explicit Points Solo for Text Spotting`
- https://arxiv.org/abs/2305.19957
## 模型结构
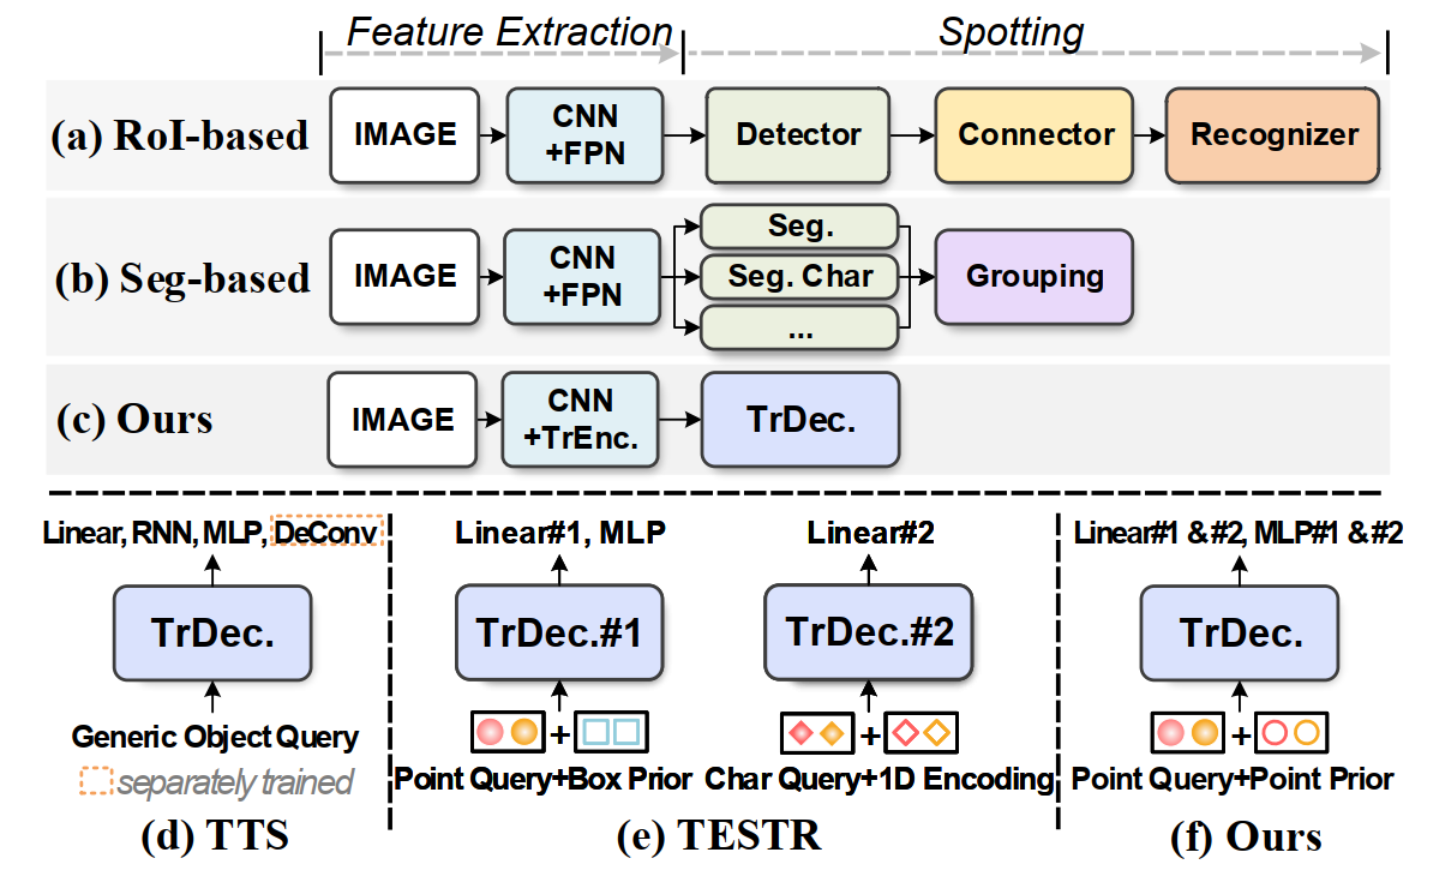
一个简洁的类似DETR的基线,允许一个具有显式点的解码器同时进行检测和识别(图 (c)、(f))。
## 算法原理
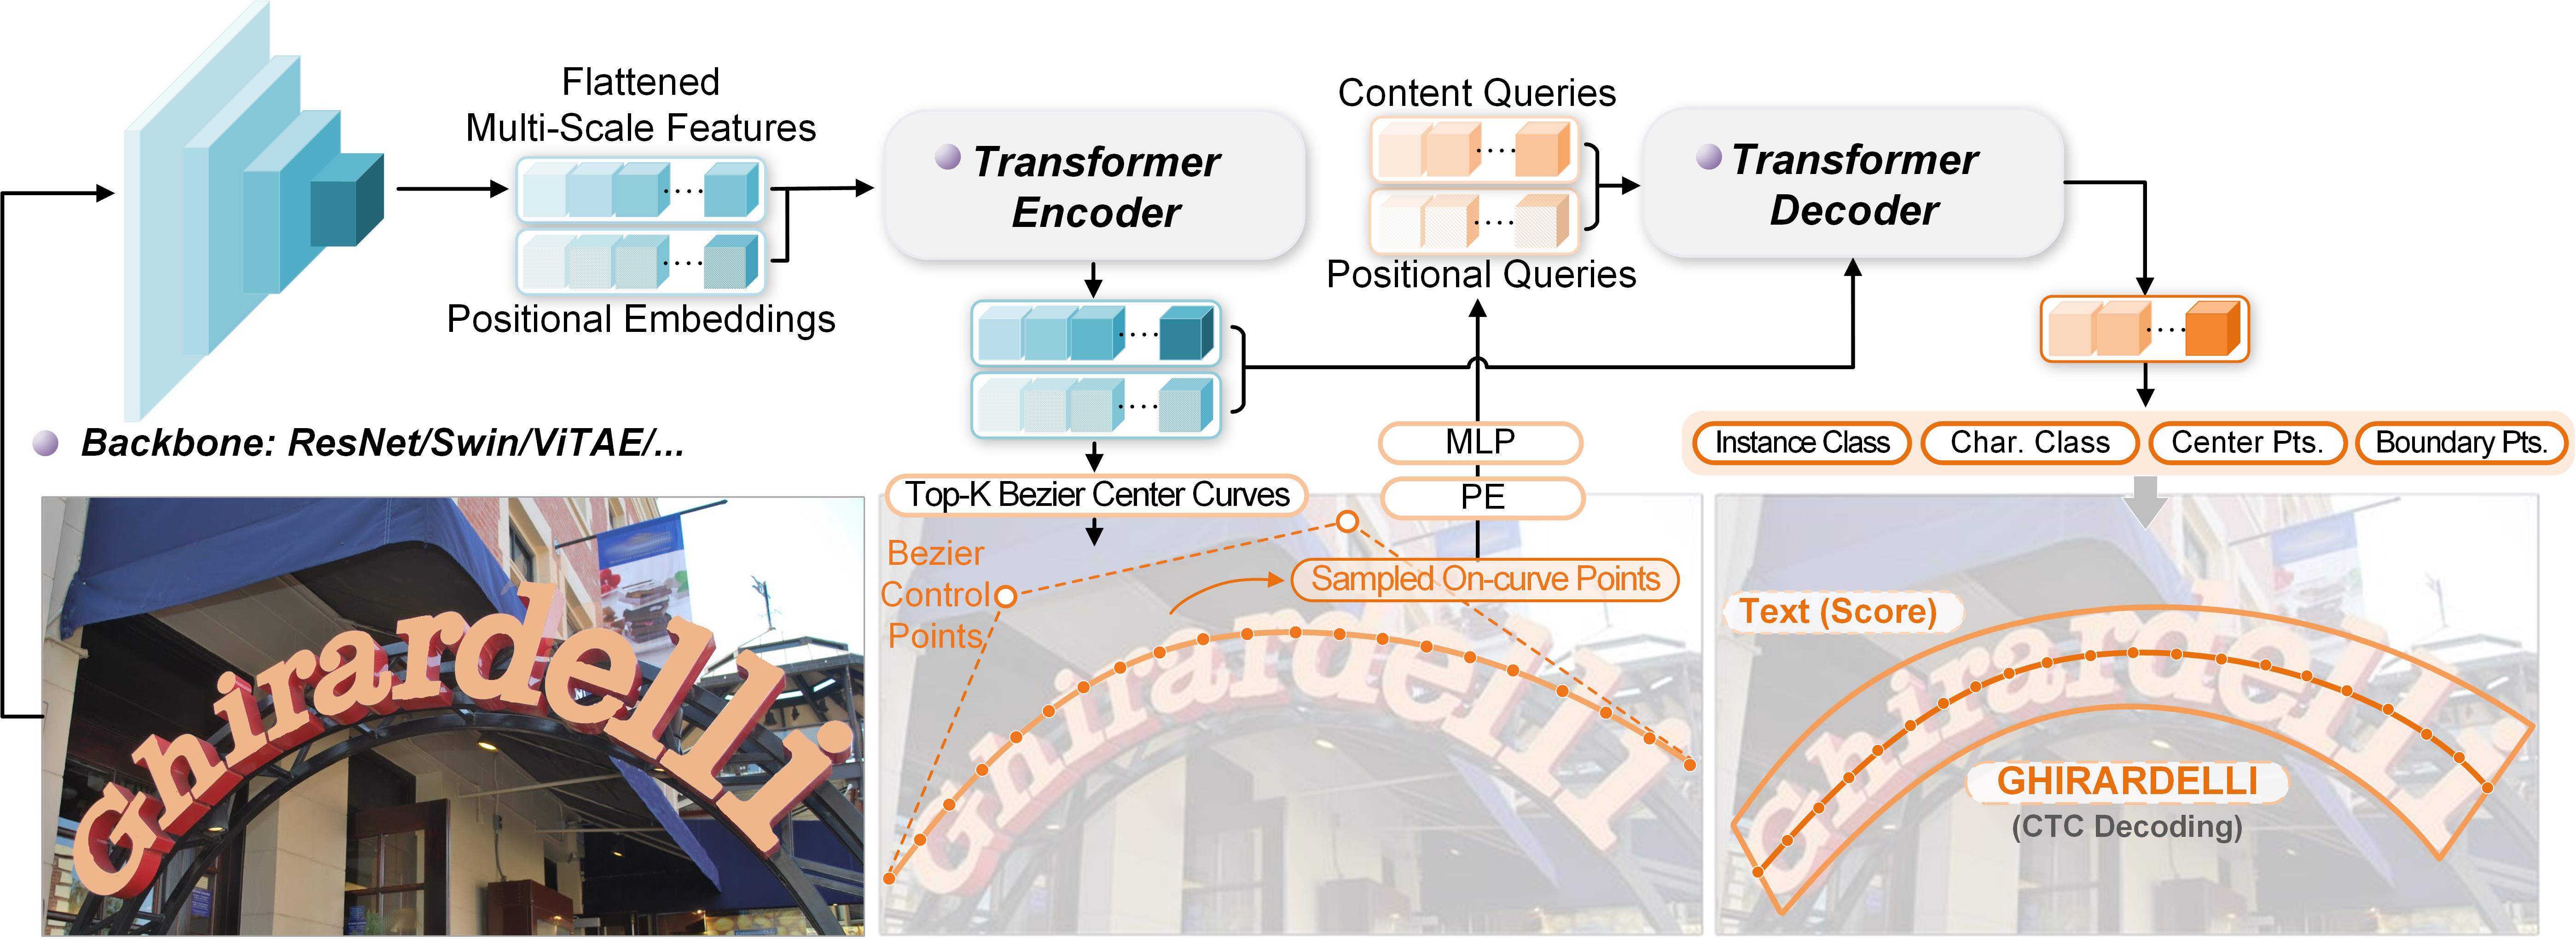
DeepSolo中,编码器在接收到图像特征后,生成由四个Bezier控制点表示的Bezier中心曲线候选和相应的分数,然后,选择前K个评分的候选。对于每个选定的曲线候选,在曲线上均匀采样N个点,这些点的坐标被编码为位置query并将其添加到内容query中形成复合query。接下来,将复合query输入deformable cross-attention解码器收集有用的文本特征。在解码器之后,采用了几个简单的并行预测头(线性层或MLP)将query解码为文本的中心线、边界、script和置信度,从而同时解决检测和识别问题。
## 环境配置
训练需要依赖**Detectron2**库,编译Detectron2库需要满足`Python ≥ 3.7`,`PyTorch ≥ 1.8`并且`torchvision`与`PyTorch`版本匹配,`gcc & g++ ≥ 5.4`。如果想要更快的构建,推荐安装`Ninja`。
Tips: 如果`detectron2`安装失败,可尝试以下方式进行安装:
```bash
git clone https://github.com/facebookresearch/detectron2.git
python -m pip install -e detectron2
```
### Docker(方法一)
-v 路径、docker_name和imageID根据实际情况修改
```
docker pull image.sourcefind.cn:5000/dcu/admin/base/pytorch:2.1.0-ubuntu20.04-dtk24.04.1-py3.8
docker run -it -v /path/your_code_data/:/path/your_code_data/ -v /opt/hyhal:/opt/hyhal:ro --shm-size=32G --privileged=true --device=/dev/kfd --device=/dev/dri/ --group-add video --name docker_name imageID bash
cd /home/deepsolo_pytorch
pip install --upgrade setuptools wheel
pip install -r requirements.txt -i https://pypi.tuna.tsinghua.edu.cn/simple
python -m pip install 'git+https://github.com/facebookresearch/detectron2.git'
bash make.sh
```
### Dockerfile(方法二)
-v 路径、docker_name和imageID根据实际情况修改
```
cd ./docker
docker build --no-cache -t deepsolo:latest .
docker run -it -v /path/your_code_data/:/path/your_code_data/ -v /opt/hyhal:/opt/hyhal:ro --shm-size=32G --privileged=true --device=/dev/kfd --device=/dev/dri/ --group-add video --name docker_name imageID bash
cd /your_code_path/deepsolo_pytorch
pip install --upgrade setuptools wheel
pip install -r requirements.txt -i https://pypi.tuna.tsinghua.edu.cn/simple
python -m pip install 'git+https://github.com/facebookresearch/detectron2.git'
bash make.sh
```
### Anaconda(方法三)
1、关于本项目DCU显卡所需的特殊深度学习库可从光合开发者社区下载安装: https://developer.sourcefind.cn/tool/
```
DTK软件栈:dtk24.04.1
python:python3.8
torch:2.1.0
torchvision:0.16.0+das1.1.git7d45932.abi1.dtk2404.torch2.1
```
Tips:以上dtk软件栈、python、torch等DCU相关工具版本需要严格一一对应
2、其他非特殊库直接按照下面步骤进行安装
```
pip install --upgrade setuptools wheel
pip install -r requirements.txt -i https://pypi.tuna.tsinghua.edu.cn/simple
python -m pip install 'git+https://github.com/facebookresearch/detectron2.git'
bash make.sh
```
## 数据集
所有的数据集请保存在`deepsolo_pytorch/datasets`下,因数据集较大,请按训练的需求进行选择下载。训练需求详见`configs文件夹下各个yaml`的**DATASETS**字段(测试数据同理)。
### 训练数据集
`[SynthText150K (CurvedSynText150K)]` [images](https://github.com/aim-uofa/AdelaiDet/tree/master/datasets) | [annotations(Part1)](https://1drv.ms/u/s!ApEsJ9RIZdBQgQTfQC578sYbkPik?e=2Yz06g) | [annotations(Part2)](https://1drv.ms/u/s!ApEsJ9RIZdBQgQJWqH404p34Wb1m?e=KImg6N) \
或者从SCNet下载
`[MLT]` [images](https://github.com/aim-uofa/AdelaiDet/tree/master/datasets) | [annotations](https://1drv.ms/u/s!ApEsJ9RIZdBQgQBpvuvV2KBBbN64?e=HVTCab) \
或者从SCNet下载
`[ICDAR2013]` [images](https://1drv.ms/u/s!ApEsJ9RIZdBQgQcK05sWzK3_t26T?e=5jTWAa) | [annotations](https://1drv.ms/u/s!ApEsJ9RIZdBQfbgqFCeiKOrTM0E?e=UMfIQh) \
或者从SCNet下载
`[ICDAR2015]` [images](https://1drv.ms/u/s!ApEsJ9RIZdBQgQbupfCNqVxtYGna?e=b4TQY2) | [annotations](https://1drv.ms/u/s!ApEsJ9RIZdBQfhGW5JDiNcDxfWQ?e=PZ2JCX) \
或者从SCNet下载
`[Total-Text]` [images](https://1drv.ms/u/s!ApEsJ9RIZdBQgQjyPyivo_FnjJ1H?e=qgSFYL) | [annotations](https://1drv.ms/u/s!ApEsJ9RIZdBQgQOShwd8O0K5Dd1f?e=GYyPAX) \
或者从SCNet下载
`[CTW1500]` [images](https://1drv.ms/u/s!ApEsJ9RIZdBQgQlZVAH5AJld3Y9g?e=zgG71Z) | [annotations](https://1drv.ms/u/s!ApEsJ9RIZdBQfPpyzxoFV34zBg4?e=WK20AN) \
或者从SCNet下载
`[TextOCR]` [images](https://dl.fbaipublicfiles.com/textvqa/images/train_val_images.zip) | [annotations](https://1drv.ms/u/s!ApEsJ9RIZdBQgQHY3mjH13GRLPGI?e=Dx1O99) \
或者从SCNet下载
`[Inverse-Text]` [images](https://1drv.ms/u/s!AimBgYV7JjTlgccVhlbD4I3z5QfmsQ?e=myu7Ue) | [annotations](https://1drv.ms/u/s!ApEsJ9RIZdBQf3G4vZpf4QD5NKo?e=xR3GtY) \
或者从SCNet下载
`[SynChinese130K]` [images](https://github.com/aim-uofa/AdelaiDet/tree/master/datasets) | [annotations](https://1drv.ms/u/s!AimBgYV7JjTlgch5W0n1Iv397i0csw?e=Gq8qww) \
或者从SCNet下载
`[ArT]` [images](https://github.com/aim-uofa/AdelaiDet/tree/master/datasets) | [annotations](https://1drv.ms/u/s!AimBgYV7JjTlgch45d0VHNCoPC1jfQ?e=likK00) \
或者从SCNet下载
`[LSVT]` [images](https://github.com/aim-uofa/AdelaiDet/tree/master/datasets) | [annotations](https://1drv.ms/u/s!AimBgYV7JjTlgch7yjmrCSN0TgoO4w?e=NKd5OG) \
或者从SCNet下载
`[ReCTS]` [images](https://github.com/aim-uofa/AdelaiDet/tree/master/datasets) | [annotations](https://1drv.ms/u/s!AimBgYV7JjTlgch_xZ8otxFWfNgZSg?e=pdq28B) \
或者从SCNet下载
`[Evaluation ground-truth]` [Link](https://1drv.ms/u/s!ApEsJ9RIZdBQem-MG1TjuRWApyA?e=fVPnmT) \
或者从SCNet下载
### 验证数据集
```bash
cd datasets
mkdir evaluation
cd evaluation
wget -O gt_ctw1500.zip https://cloudstor.aarnet.edu.au/plus/s/xU3yeM3GnidiSTr/download
wget -O gt_totaltext.zip https://cloudstor.aarnet.edu.au/plus/s/SFHvin8BLUM4cNd/download
wget -O gt_icdar2015.zip https://drive.google.com/file/d/1wrq_-qIyb_8dhYVlDzLZTTajQzbic82Z/view?usp=sharing
wget -O gt_inversetext.zip https://cloudstor.aarnet.edu.au/plus/s/xU3yeM3GnidiSTr/download
# 或者从上面训练数据集中对应数据集的SCNet链接手动下载
```
### 数据集目录结构
用于正常训练的数据集请按此目录结构进行:
```
├── datasets
│ ├── simple
│ ├── test_images
│ ├── train_images
│ ├── test.json
│ └── train.json
│ ├── evaluation
│ ├── gt_totaltext.zip
│ ├── gt_ctw1500.zip
│ ├── gt_icdar2015.zip
│ └── gt_inversetext.zip
│ ├── syntext1
│ ├── train_images
│ └── annotations
│ ├── train_37voc.json
│ └── train_96voc.json
│ ├── syntext2
│ ├── train_images
│ └── annotations
│ ├── train_37voc.json
│ └── train_96voc.json
│ ├── mlt2017
│ ├── train_images
│ ├── train_37voc.json
│ └── train_96voc.json
│ ├── totaltext
│ ├── train_images
│ ├── test_images
│ ├── weak_voc_new.txt
│ ├── weak_voc_pair_list.txt
│ ├── train_37voc.json
│ ├── train_96voc.json
│ └── test.json
│ ├── ic13
│ ├── train_images
│ ├── train_37voc.json
│ └── train_96voc.json
│ ├── ic15
│ ├── train_images
│ ├── test_images
│ ├── new_strong_lexicon
│ ├── strong_lexicon
│ ├── ch4_test_vocabulary.txt
│ ├── ch4_test_vocabulary_new.txt
│ ├── ch4_test_vocabulary_pair_list.txt
│ ├── GenericVocabulary.txt
│ ├── GenericVocabulary_new.txt
│ ├── GenericVocabulary_pair_list.txt
│ ├── train_37voc.json
│ ├── train_96voc.json
│ └── test.json
│ ├── ctw1500
│ ├── train_images
│ ├── test_images
│ ├── weak_voc_new.txt
│ ├── weak_voc_pair_list.txt
│ ├── train_96voc.json
│ └── test.json
│ ├── textocr
│ ├── train_images
│ ├── train_37voc_1.json
│ └── train_37voc_2.json
│ ├── inversetext
│ ├── test_images
│ └── test.json
│ ├── chnsyntext
│ ├── syn_130k_images
│ └── chn_syntext.json
│ ├── ArT
│ ├── rename_artimg_train
│ └── art_train.json
│ ├── LSVT
│ ├── rename_lsvtimg_train
│ └── lsvt_train.json
│ ├── ReCTS
│ ├── ReCTS_train_images # 18,000 images
│ ├── ReCTS_val_images # 2,000 images
│ ├── ReCTS_test_images # 5,000 images
│ ├── rects_train.json
│ ├── rects_val.json
│ └── rects_test.json
```
如果使用自己的数据集,请将数据标注转换成**COCO**的格式,并在`DeepSolo/adet/data/builtin.py`代码第18行`_PREDEFINED_SPLITS_TEXT`参数中,参照结构补充自己的数据集。
项目同样提供了迷你数据集`simple`进行学习。
## 训练
### 单机多卡
Tips: 以下参数请根据实际情况自行修改 train.sh 中的参数设定
`--config-file` yaml文件配置地址
`--num-gpus` 训练卡数量
修改后执行:
```bash
bash train.sh
```
## 推理
Tips:
测试有两种展示,一种 `visualization show`, 测试完成后会在`--output`路径下生成测试图片结果;
第二种是`eval show`, 测试完成后会展示测试结果数据, 没有测试图片结果展示。
需要修改的主要参数说明如下:
`${CONFIG_FILE}` yaml文件配置地址(注意修改预训练模型地址)
`${IMAGE_PATH}` 待测试数据地址
`${MODEL_PATH}` 待测试预训练模型地址
如需执行自己的预训练模型,请修改对应配置(visualization show 的模型地址修改在yaml文件中, eval show 的模型地址修改为${MODEL_PATH}参数输入), 具体配置可参考`test.sh`中提供的样例。
以 visualization show 为, 执行步骤如下:
1. 下载CTW1500的预训练模型`pretrain_ctw_96voc.pth`:
|Backbone|Training Data|Weights|
|:------:|:------:|:------:|
|Res-50|Synth150K+Total-Text+MLT17+IC13+IC15|[OneDrive](https://1drv.ms/u/s!AimBgYV7JjTlgcdtYzwEBGvOH6CiBw?e=trgKFE) / [SCNet]|
将预训练模型放在`pretrained_models/CTW1500/`文件夹下,如果放置于其他地方,请同步修改yaml配置文件中`MODEL.WEIGHTS`地址。
2. 将待测试数据存放于`${IMAGE_PATH}`下,执行
```bash
bash test.sh
```
3. 推理结果默认保存在`test_results`文件夹下,可以使用参数`--output`替换结果保存路径。
## result
CTW1500上的结果展示:
### 精度
基于`backbone=R50`在`ctw1500`上的测试结果如下表所示:
|Backbone|External Data|Det-P|Det-R|Det-F1|E2E-None|E2E-Generic|
|:------:|:------:|:------:|:------:|:------:|:------:|:------:|
|Res-50(ours)|Synth150K+Total-Text+MLT17+IC13+IC15|0.9320|0.8363|0.8816|0.6783|0.9349|
|Res-50|Synth150K+Total-Text+MLT17+IC13+IC15|0.9329|0.8478|0.8883|0.6742|0.9373|
## 应用场景
### 算法类别
OCR
### 热点应用行业
政府,交通,物流
## 源码仓库及问题反馈
http://developer.sourcefind.cn/codes/modelzoo/deepsolo_pytorch.git
## 参考资料
https://github.com/ViTAE-Transformer/DeepSolo.git