"""
Media Stream API
================
This tutorial shows how to use torchaudio's I/O stream API to
fetch and decode audio/video data and apply preprocessings that
libavfilter provides.
"""
######################################################################
#
# .. note::
#
# This tutorial requires torchaudio with prototype features and
# FFmpeg libraries (>=4.1).
#
# The torchaudio prototype features are available on nightly builds.
# Please refer to https://pytorch.org/get-started/locally/
# for instructions.
#
# The interfaces of prototype features are unstable and subject to
# change. Please refer to `the nightly build documentation
# `__ for the up-to-date
# API references.
#
# There are multiple ways to install FFmpeg libraries.
# If you are using Anaconda Python distribution,
# ``conda install -c anaconda ffmpeg`` will install
# the required libraries.
#
# When running this tutorial in Google Colab, the following
# command should do.
#
# .. code::
#
# !add-apt-repository -y ppa:savoury1/ffmpeg4
# !apt-get -qq install -y ffmpeg
######################################################################
# 1. Overview
# -----------
#
# Streaming API leverages the powerful I/O features of ffmpeg.
#
# It can
# - Load audio/video in variety of formats
# - Load audio/video from local/remote source
# - Load audio/video from microphone, camera and screen
# - Generate synthetic audio/video signals.
# - Load audio/video chunk by chunk
# - Change the sample rate / frame rate, image size, on-the-fly
# - Apply filters and preprocessings
#
# The streaming API works in three steps.
#
# 1. Open media source (file, device, synthetic pattern generator)
# 2. Configure output stream
# 3. Stream the media
#
# At this moment, the features that the ffmpeg integration provides
# are limited to the form of
#
# ` -> -> `
#
# If you have other forms that can be useful to your usecases,
# (such as integration with `torch.Tensor` type and file-like objects)
# please file a feature request.
#
######################################################################
# 2. Preparation
# --------------
#
import IPython
import matplotlib.pyplot as plt
import torch
import torchaudio
from torchaudio.prototype.io import Streamer
print(torch.__version__)
print(torchaudio.__version__)
base_url = "https://download.pytorch.org/torchaudio/tutorial-assets"
AUDIO_URL = f"{base_url}/Lab41-SRI-VOiCES-src-sp0307-ch127535-sg0042.wav"
VIDEO_URL = f"{base_url}/stream-api/NASAs_Most_Scientifically_Complex_Space_Observatory_Requires_Precision-MP4.mp4"
######################################################################
# 3. Opening the source
# ---------------------
#
# There are mainly three different sources that streaming API can
# handle. Whichever source is used, the remaining processes
# (configuring the output, applying preprocessing) are same.
#
# 1. Common media formats
# 2. Audio / Video devices
# 3. Synthetic audio / video sources
#
# The following section covers how to open common media formats.
# For the other streams, please refer to the
# `Advanced I/O streams` section.
#
######################################################################
#
# To open a media file, you can simply pass the path of the file to
# the constructor of `Streamer`.
#
# .. code::
#
# Streamer(src="audio.wav")
#
# Streamer(src="audio.mp3")
#
# This works for image file, video file and video streams.
#
# .. code::
#
# # Still image
# Streamer(src="image.jpeg")
#
# # Video file
# Streamer(src="video.mpeg")
#
# # Video on remote server
# Streamer(src="https://example.com/video.mp4")
#
# # Playlist format
# Streamer(src="https://example.com/playlist.m3u")
#
# If attempting to load headerless raw data, you can use ``format`` and
# ``option`` to specify the format of the data.
#
# Say, you converted an audio file into faw format with ``sox`` command
# as follow;
#
# .. code::
#
# # Headerless, 16-bit signed integer PCM, resampled at 16k Hz.
# $ sox original.wav -r 16000 raw.s2
#
# Such audio can be opened like following.
#
# .. code::
#
# Streamer(src="raw.s2", format="s16le", option={"sample_rate": "16000"})
#
######################################################################
# 4. Checking the source streams
# ------------------------------
#
# Once the media is opened, we can inspect the streams and configure
# the output streams.
#
# You can check the number of source streams with
# :py:attr:`~torchaudio.prototype.io.Streamer.num_src_streams`.
#
# .. note::
# The number of streams is NOT the number of channels.
# Each audio stream can contain an arbitrary number of channels.
#
# To check the metadata of source stream you can use
# :py:meth:`~torchaudio.prototype.io.Streamer.get_src_stream_info`
# method and provide the index of the source stream.
#
# This method returns
# :py:class:`~torchaudio.prototype.io.SourceStream`. If a source
# stream is audio type, then the return type is
# :py:class:`~torchaudio.prototype.io.SourceAudioStream`, which is
# a subclass of `SourceStream`, with additional audio-specific attributes.
# Similarly, if a source stream is video type, then the return type is
# :py:class:`~torchaudio.prototype.io.SourceVideoStream`.
######################################################################
# For regular audio formats and still image formats, such as `WAV`
# and `JPEG`, the number of souorce streams is 1.
#
streamer = Streamer(AUDIO_URL)
print("The number of source streams:", streamer.num_src_streams)
print(streamer.get_src_stream_info(0))
######################################################################
# Container formats and playlist formats may contain multiple streams
# of different media type.
#
src = "https://devstreaming-cdn.apple.com/videos/streaming/examples/img_bipbop_adv_example_fmp4/master.m3u8"
streamer = Streamer(src)
print("The number of source streams:", streamer.num_src_streams)
for i in range(streamer.num_src_streams):
print(streamer.get_src_stream_info(i))
######################################################################
# 5. Configuring output streams
# -------------------------------
#
# The stream API lets you stream data from an arbitrary combination of
# the input streams. If your application does not need audio or video,
# you can omit them. Or if you want to apply different preprocessing
# to the same source stream, you can duplicate the source stream.
#
######################################################################
# 5.1. Default streams
# --------------------
#
# When there are multiple streams in the source, it is not immediately
# clear which stream should be used.
#
# FFmpeg implements some heuristics to determine the default stream.
# The resulting stream index is exposed via
#
# :py:attr:`~torchaudio.prototype.io.Streamer.default_audio_stream` and
# :py:attr:`~torchaudio.prototype.io.Streamer.default_video_stream`.
#
######################################################################
# 5.2. Configuring output streams
# -------------------------------
#
# Once you know which source stream you want to use, then you can
# configure output streams with
# :py:meth:`~torchaudio.prototype.io.Streamer.add_basic_audio_stream` and
# :py:meth:`~torchaudio.prototype.io.Streamer.add_basic_video_stream`.
#
# These methods provide a simple way to change the basic property of
# media to match the application's requirements.
#
# The arguments common to both methods are;
#
# - ``frames_per_chunk``: How many frames at maximum should be
# returned at each iteration.
# For audio, the resulting tensor will be the shape of
# `(frames_per_chunk, num_channels)`.
# For video, it will be
# `(frames_per_chunk, num_channels, height, width)`.
# - ``buffer_chunk_size``: The maximum number of chunks to be buffered internally.
# When the Streamer buffered this number of chunks and is asked to pull
# more frames, Streamer drops the old frames/chunks.
# - ``stream_index``: The index of the source stream.
#
# For audio output stream, you can provide the following additional
# parameters to change the audio properties.
#
# - ``sample_rate``: When provided, Streamer resamples the audio on-the-fly.
# - ``dtype``: By default the Streamer returns tensor of `float32` dtype,
# with sample values ranging `[-1, 1]`. By providing ``dtype`` argument
# the resulting dtype and value range is changed.
#
# For video output stream, the following parameters are available.
#
# - ``frame_rate``: Change the frame rate by dropping or duplicating
# frames. No interpolation is performed.
# - ``width``, ``height``: Change the image size.
# - ``format``: Change the image format.
#
######################################################################
#
# .. code::
#
# streamer = Streamer(...)
#
# # Stream audio from default audio source stream
# # 256 frames at a time, keeping the original sampling rate.
# streamer.add_basic_audio_stream(
# frames_per_chunk=256,
# )
#
# # Stream audio from source stream `i`.
# # Resample audio to 8k Hz, stream 256 frames at each
# streamer.add_basic_audio_stream(
# frames_per_chunk=256,
# stream_index=i,
# sample_rate=8000,
# )
#
######################################################################
#
# .. code::
#
# # Stream video from default video source stream.
# # 10 frames at a time, at 30 FPS
# # RGB color channels.
# streamer.add_basic_video_stream(
# frames_per_chunk=10,
# frame_rate=30,
# format="RGB"
# )
#
# # Stream video from source stream `j`,
# # 10 frames at a time, at 30 FPS
# # BGR color channels with rescaling to 128x128
# streamer.add_basic_video_stream(
# frames_per_chunk=10,
# stream_index=j,
# frame_rate=30,
# width=128,
# height=128,
# format="BGR"
# )
#
######################################################################
#
# You can check the resulting output streams in a similar manner as
# checking the source streams.
# :py:attr:`~torchaudio.prototype.io.Streamer.num_out_streams` reports
# the number of configured output streams, and
# :py:meth:`~torchaudio.prototype.io.Streamer.get_out_stream_info`
# fetches the information about the output streams.
#
# .. code::
#
# for i in range(streamer.num_out_streams):
# print(streamer.get_out_stream_info(i))
#
######################################################################
#
# If you want to remove an output stream, you can do so with
# :py:meth:`~torchaudio.prototype.io.Streamer.remove_stream` method.
#
# .. code::
#
# # Removes the first output stream.
# streamer.remove_stream(0)
#
######################################################################
# 5.3. Streaming
# --------------
#
# To stream media data, the streamer alternates the process of
# fetching and decoding the source data, and passing the resulting
# audio / video data to client code.
#
# There are low-level methods that performs these operations.
# :py:meth:`~torchaudio.prototype.io.Streamer.is_buffer_ready`,
# :py:meth:`~torchaudio.prototype.io.Streamer.process_packet` and
# :py:meth:`~torchaudio.prototype.io.Streamer.pop_chunks`.
#
# In this tutorial, we will use the high-level API, iterator protocol.
# It is as simple as a ``for`` loop.
#
# .. code::
#
# streamer = Streamer(...)
# streamer.add_basic_audio_stream(...)
# streamer.add_basic_video_stream(...)
#
# for chunks in streamer.stream():
# audio_chunk, video_chunk = chunks
# ...
#
######################################################################
# 6. Example
# ----------
#
# Let's take an example video to configure the output streams.
# We will use the following video.
#
# .. raw:: html
#
#
#
# Source: https://svs.gsfc.nasa.gov/13013 (This video is in public domain)
#
# Credit: NASA's Goddard Space Flight Center.
#
# NASA's Media Usage Guidelines: https://www.nasa.gov/multimedia/guidelines/index.html
#
#
######################################################################
#
# 6.1. Opening the source media
# ------------------------------
# Firstly, let's list the available streams and its properties.
#
streamer = Streamer(VIDEO_URL)
for i in range(streamer.num_src_streams):
print(streamer.get_src_stream_info(i))
######################################################################
#
# Now we configure the output stream.
#
# 6.2. Configuring ouptut streams
# -------------------------------
# fmt: off
# Audio stream with 8k Hz
streamer.add_basic_audio_stream(
frames_per_chunk=8000,
sample_rate=8000,
)
# Audio stream with 16k Hz
streamer.add_basic_audio_stream(
frames_per_chunk=16000,
sample_rate=16000,
)
# Video stream with 960x540 at 1 FPS.
streamer.add_basic_video_stream(
frames_per_chunk=1,
frame_rate=1,
width=960,
height=540,
format="RGB",
)
# Video stream with 320x320 (stretched) at 3 FPS, grayscale
streamer.add_basic_video_stream(
frames_per_chunk=3,
frame_rate=3,
width=320,
height=320,
format="GRAY",
)
# fmt: on
######################################################################
# .. note::
#
# When configuring multiple output streams, in order to keep all
# streams synced, set parameters so that the ratio between
# ``frames_per_chunk`` and ``sample_rate`` or ``frame_rate`` is
# consistent across output streams.
#
######################################################################
# Checking the output streams.
#
for i in range(streamer.num_out_streams):
print(streamer.get_out_stream_info(i))
######################################################################
# Remove the second audio stream.
#
streamer.remove_stream(1)
for i in range(streamer.num_out_streams):
print(streamer.get_out_stream_info(i))
######################################################################
# 6.3. Streaming
# --------------
#
######################################################################
# Jump to the 10 second point.
#
streamer.seek(10.0)
######################################################################
#
# Now, let's finally iterate over the output streams.
#
n_ite = 3
waveforms, vids1, vids2 = [], [], []
for i, (waveform, vid1, vid2) in enumerate(streamer.stream()):
waveforms.append(waveform)
vids1.append(vid1)
vids2.append(vid2)
if i + 1 == n_ite:
break
######################################################################
# For audio stream, the chunk Tensor will be the shape of
# `(frames_per_chunk, num_channels)`, and for video stream,
# it is `(frames_per_chunk, num_color_channels, height, width)`.
#
print(waveforms[0].shape)
print(vids1[0].shape)
print(vids2[0].shape)
######################################################################
# Let's visualize what we received.
k = 3
fig = plt.figure()
gs = fig.add_gridspec(3, k * n_ite)
for i, waveform in enumerate(waveforms):
ax = fig.add_subplot(gs[0, k * i : k * (i + 1)])
ax.specgram(waveform[:, 0], Fs=8000)
ax.set_yticks([])
ax.set_xticks([])
ax.set_title(f"Iteration {i}")
if i == 0:
ax.set_ylabel("Stream 0")
for i, vid in enumerate(vids1):
ax = fig.add_subplot(gs[1, k * i : k * (i + 1)])
ax.imshow(vid[0].permute(1, 2, 0)) # NCHW->HWC
ax.set_yticks([])
ax.set_xticks([])
if i == 0:
ax.set_ylabel("Stream 1")
for i, vid in enumerate(vids2):
for j in range(3):
ax = fig.add_subplot(gs[2, k * i + j : k * i + j + 1])
ax.imshow(vid[j].permute(1, 2, 0), cmap="gray")
ax.set_yticks([])
ax.set_xticks([])
if i == 0 and j == 0:
ax.set_ylabel("Stream 2")
plt.tight_layout()
plt.show(block=False)
######################################################################
# [Advanced I/O streams]
# ----------------------
#
######################################################################
# 1. Audio / Video device input
# -----------------------------
#
# .. seealso::
#
# `Device ASR with Emformer RNN-T <./device_asr.html>`__.
#
# Given that the system has proper media devices and libavdevice is
# configured to use the devices, the streaming API can
# pull media streams from these devices.
#
# To do this, we pass additional parameters ``format`` and ``option``
# to the constructor. ``format`` specifies the device component and
# ``option`` dictionary is specific to the specified component.
#
# The exact arguments to be passed depend on the system configuration.
# Please refer to https://ffmpeg.org/ffmpeg-devices.html for the detail.
#
# The following example illustrates how one can do this on MacBook Pro.
#
# First, we need to check the available devices.
#
# .. code::
#
# $ ffmpeg -f avfoundation -list_devices true -i ""
# [AVFoundation indev @ 0x143f04e50] AVFoundation video devices:
# [AVFoundation indev @ 0x143f04e50] [0] FaceTime HD Camera
# [AVFoundation indev @ 0x143f04e50] [1] Capture screen 0
# [AVFoundation indev @ 0x143f04e50] AVFoundation audio devices:
# [AVFoundation indev @ 0x143f04e50] [0] MacBook Pro Microphone
#
# We use `FaceTime HD Camera` as video device (index 0) and
# `MacBook Pro Microphone` as audio device (index 0).
#
# If we do not pass any ``option``, the device uses its default
# configuration. The decoder might not support the configuration.
#
# .. code::
#
# >>> Streamer(
# ... src="0:0", # The first 0 means `FaceTime HD Camera`, and
# ... # the second 0 indicates `MacBook Pro Microphone`.
# ... format="avfoundation",
# ... )
# [avfoundation @ 0x125d4fe00] Selected framerate (29.970030) is not supported by the device.
# [avfoundation @ 0x125d4fe00] Supported modes:
# [avfoundation @ 0x125d4fe00] 1280x720@[1.000000 30.000000]fps
# [avfoundation @ 0x125d4fe00] 640x480@[1.000000 30.000000]fps
# Traceback (most recent call last):
# File "", line 1, in
# ...
# RuntimeError: Failed to open the input: 0:0
#
# By providing ``option``, we can change the format that the device
# streams to a format supported by decoder.
#
# .. code::
#
# >>> streamer = Streamer(
# ... src="0:0",
# ... format="avfoundation",
# ... option={"framerate": "30", "pixel_format": "bgr0"},
# ... )
# >>> for i in range(streamer.num_src_streams):
# ... print(streamer.get_src_stream_info(i))
# SourceVideoStream(media_type='video', codec='rawvideo', codec_long_name='raw video', format='bgr0', bit_rate=0, width=640, height=480, frame_rate=30.0)
# SourceAudioStream(media_type='audio', codec='pcm_f32le', codec_long_name='PCM 32-bit floating point little-endian', format='flt', bit_rate=3072000, sample_rate=48000.0, num_channels=2)
#
######################################################################
# 2. Synthetic source streams
# ---------------------------
#
# As a part of device integration, ffmpeg provides a "virtual device"
# interface. This interface provides synthetic audio / video data
# generation using libavfilter.
#
# To use this, we set ``format=lavfi`` and provide a filter description
# to ``src``.
#
# The detail of filter description can be found at
# https://ffmpeg.org/ffmpeg-filters.html
#
######################################################################
# 2.1. Synthetic audio examples
# -----------------------------
#
######################################################################
# Sine wave with
# ~~~~~~~~~~~~~~
#
# https://ffmpeg.org/ffmpeg-filters.html#sine
#
# .. code::
#
# Streamer(src="sine=sample_rate=8000:frequency=360", format="lavfi")
#
# .. raw:: html
#
#
#
#
######################################################################
# Generate an audio signal specified by an expression
# ~~~~~~~~~~~~~~~~~~~~~~~~~~~~~~~~~~~~~~~~~~~~~~~~~~~
#
# https://ffmpeg.org/ffmpeg-filters.html#aevalsrc
#
# .. code::
#
# # 5 Hz binaural beats on a 360 Hz carrier
# Streamer(
# src=(
# 'aevalsrc='
# 'sample_rate=8000:'
# 'exprs=0.1*sin(2*PI*(360-5/2)*t)|0.1*sin(2*PI*(360+5/2)*t)'
# ),
# format='lavfi',
# )
#
# .. raw:: html
#
#
#
#
######################################################################
# Generate noise with
# ~~~~~~~~~~~~~~~~~~~
# https://ffmpeg.org/ffmpeg-filters.html#anoisesrc
#
# .. code::
#
# Streamer(src="anoisesrc=color=pink:sample_rate=8000:amplitude=0.5", format="lavfi")
#
# .. raw:: html
#
#
#
#
######################################################################
# 2.2. Synthetic video examples
# -----------------------------
#
######################################################################
# Cellular automaton
# ~~~~~~~~~~~~~~~~~~
# https://ffmpeg.org/ffmpeg-filters.html#cellauto
#
# .. code::
#
# Streamer(src=f"cellauto", format="lavfi")
#
# .. raw:: html
#
#
#
######################################################################
# Mandelbrot
# ~~~~~~~~~~
# https://ffmpeg.org/ffmpeg-filters.html#cellauto
#
# .. code::
#
# Streamer(src=f"mandelbrot", format="lavfi")
#
# .. raw:: html
#
#
#
######################################################################
# MPlayer Test patterns
# ~~~~~~~~~~~~~~~~~~~~~
# https://ffmpeg.org/ffmpeg-filters.html#mptestsrc
#
# .. code::
#
# Streamer(src=f"mptestsrc", format="lavfi")
#
# .. raw:: html
#
#
#
######################################################################
# John Conway's life game
# ~~~~~~~~~~~~~~~~~~~~~~~
# https://ffmpeg.org/ffmpeg-filters.html#life
#
# .. code::
#
# Streamer(src=f"life", format="lavfi")
#
# .. raw:: html
#
#
#
######################################################################
# Sierpinski carpet/triangle fractal
# ~~~~~~~~~~~~~~~~~~~~~~~~~~~~~~~~~~
# https://ffmpeg.org/ffmpeg-filters.html#sierpinski
#
# .. code::
#
# Streamer(src=f"sierpinski", format="lavfi")
#
# .. raw:: html
#
#
#
######################################################################
# 3. Custom output streams
# ------------------------
#
# When defining an output stream, you can use
# :py:meth:`~torchaudio.prototype.io.Streamer.add_audio_stream` and
# :py:meth:`~torchaudio.prototype.io.Streamer.add_video_stream` methods.
#
# These methods take ``filter_desc`` argument, which is a string
# formatted according to ffmpeg's
# `filter expression `_.
#
# The difference between ``add_basic_(audio|video)_stream`` and
# ``add_(audio|video)_stream`` is that ``add_basic_(audio|video)_stream``
# constructs the filter expression and passes it to the same underlying
# implementation. Everything ``add_basic_(audio|video)_stream`` can be
# achieved with ``add_(audio|video)_stream``.
#
# .. note::
#
# - When applying custom filters, the client code must convert
# the audio/video stream to one of the formats that torchaudio
# can convert to tensor format.
# This can be achieved, for example, by applying
# ``format=pix_fmts=rgb24`` to video stream and
# ``aformat=sample_fmts=fltp`` to audio stream.
# - Each output stream has separate filter graph. Therefore, it is
# not possible to use different input/output streams for a
# filter expression. However, it is possible to split one input
# stream into multiple of them, and merge them later.
#
######################################################################
# 3.1. Custom audio streams
# -------------------------
#
#
# fmt: off
descs = [
# No filtering
"anull",
# Apply a highpass filter then a lowpass filter
"highpass=f=200,lowpass=f=1000",
# Manipulate spectrogram
(
"afftfilt="
"real='hypot(re,im)*sin(0)':"
"imag='hypot(re,im)*cos(0)':"
"win_size=512:"
"overlap=0.75"
),
# Manipulate spectrogram
(
"afftfilt="
"real='hypot(re,im)*cos((random(0)*2-1)*2*3.14)':"
"imag='hypot(re,im)*sin((random(1)*2-1)*2*3.14)':"
"win_size=128:"
"overlap=0.8"
),
]
# fmt: on
######################################################################
#
sample_rate = 8000
streamer = Streamer(AUDIO_URL)
for desc in descs:
streamer.add_audio_stream(
frames_per_chunk=40000,
filter_desc=f"aresample={sample_rate},{desc},aformat=sample_fmts=fltp",
)
chunks = next(streamer.stream())
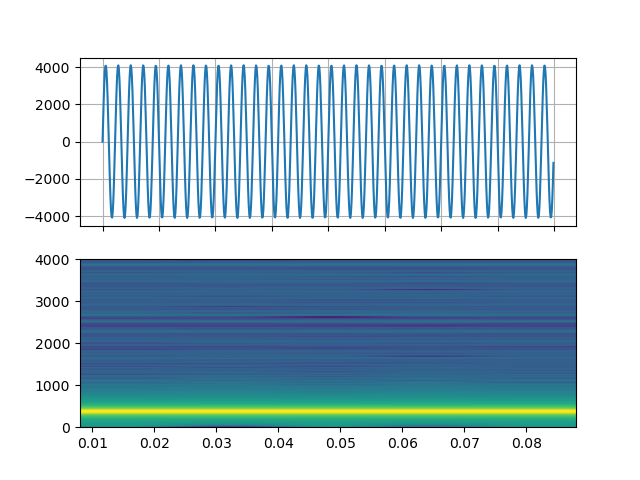
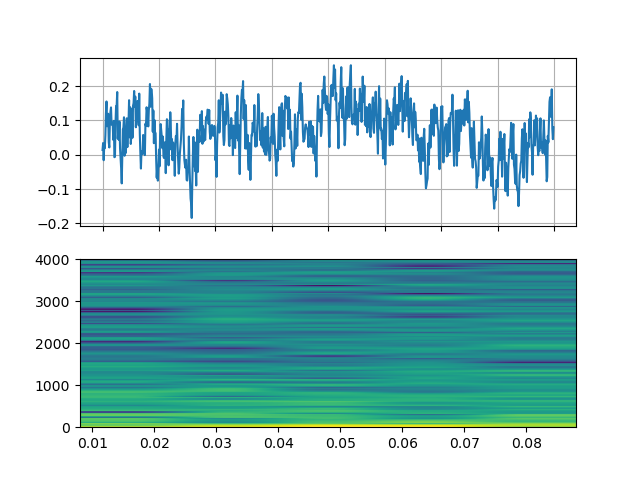
def _display(i):
print("filter_desc:", streamer.get_out_stream_info(i).filter_description)
_, axs = plt.subplots(2, 1)
waveform = chunks[i][:, 0]
axs[0].plot(waveform)
axs[0].grid(True)
axs[0].set_ylim([-1, 1])
plt.setp(axs[0].get_xticklabels(), visible=False)
axs[1].specgram(waveform, Fs=sample_rate)
return IPython.display.Audio(chunks[i].T, rate=sample_rate)
######################################################################
# Original
# ~~~~~~~~
#
_display(0)
######################################################################
# Highpass / lowpass filter
# ~~~~~~~~~~~~~~~~~~~~~~~~~
#
_display(1)
######################################################################
# FFT filter - Robot 🤖
# ~~~~~~~~~~~~~~~~~~~~~
#
_display(2)
######################################################################
# FFT filter - Whisper
# ~~~~~~~~~~~~~~~~~~~~
#
_display(3)
######################################################################
# 3.2. Custom video streams
# -------------------------
#
# fmt: off
descs = [
# No effect
"null",
# Split the input stream and apply horizontal flip to the right half.
(
"split [main][tmp];"
"[tmp] crop=iw/2:ih:0:0, hflip [flip];"
"[main][flip] overlay=W/2:0"
),
# Edge detection
"edgedetect=mode=canny",
# Rotate image by randomly and fill the background with brown
"rotate=angle=-random(1)*PI:fillcolor=brown",
# Manipulate pixel values based on the coordinate
"geq=r='X/W*r(X,Y)':g='(1-X/W)*g(X,Y)':b='(H-Y)/H*b(X,Y)'"
]
# fmt: on
######################################################################
#
streamer = Streamer(VIDEO_URL)
for desc in descs:
streamer.add_video_stream(
frames_per_chunk=30,
filter_desc=f"fps=10,{desc},format=pix_fmts=rgb24",
)
streamer.seek(12)
chunks = next(streamer.stream())
def _display(i):
print("filter_desc:", streamer.get_out_stream_info(i).filter_description)
_, axs = plt.subplots(1, 3, figsize=(8, 1.9))
chunk = chunks[i]
for j in range(3):
axs[j].imshow(chunk[10 * j + 1].permute(1, 2, 0))
axs[j].set_axis_off()
plt.tight_layout()
plt.show(block=False)
######################################################################
# Original
# ~~~~~~~~
_display(0)
######################################################################
# Mirror
# ~~~~~~
_display(1)
######################################################################
# Edge detection
# ~~~~~~~~~~~~~~~
_display(2)
######################################################################
# Random rotation
# ~~~~~~~~~~~~~~~
_display(3)
######################################################################
# Pixel manipulation
# ~~~~~~~~~~~~~~~~~~
_display(4)
 #
######################################################################
# Generate an audio signal specified by an expression
# ~~~~~~~~~~~~~~~~~~~~~~~~~~~~~~~~~~~~~~~~~~~~~~~~~~~
#
# https://ffmpeg.org/ffmpeg-filters.html#aevalsrc
#
# .. code::
#
# # 5 Hz binaural beats on a 360 Hz carrier
# Streamer(
# src=(
# 'aevalsrc='
# 'sample_rate=8000:'
# 'exprs=0.1*sin(2*PI*(360-5/2)*t)|0.1*sin(2*PI*(360+5/2)*t)'
# ),
# format='lavfi',
# )
#
# .. raw:: html
#
#
#
#
######################################################################
# Generate an audio signal specified by an expression
# ~~~~~~~~~~~~~~~~~~~~~~~~~~~~~~~~~~~~~~~~~~~~~~~~~~~
#
# https://ffmpeg.org/ffmpeg-filters.html#aevalsrc
#
# .. code::
#
# # 5 Hz binaural beats on a 360 Hz carrier
# Streamer(
# src=(
# 'aevalsrc='
# 'sample_rate=8000:'
# 'exprs=0.1*sin(2*PI*(360-5/2)*t)|0.1*sin(2*PI*(360+5/2)*t)'
# ),
# format='lavfi',
# )
#
# .. raw:: html
#
#
#  #
######################################################################
# Generate noise with
# ~~~~~~~~~~~~~~~~~~~
# https://ffmpeg.org/ffmpeg-filters.html#anoisesrc
#
# .. code::
#
# Streamer(src="anoisesrc=color=pink:sample_rate=8000:amplitude=0.5", format="lavfi")
#
# .. raw:: html
#
#
#
#
######################################################################
# Generate noise with
# ~~~~~~~~~~~~~~~~~~~
# https://ffmpeg.org/ffmpeg-filters.html#anoisesrc
#
# .. code::
#
# Streamer(src="anoisesrc=color=pink:sample_rate=8000:amplitude=0.5", format="lavfi")
#
# .. raw:: html
#
#
#  #
######################################################################
# 2.2. Synthetic video examples
# -----------------------------
#
######################################################################
# Cellular automaton
# ~~~~~~~~~~~~~~~~~~
# https://ffmpeg.org/ffmpeg-filters.html#cellauto
#
# .. code::
#
# Streamer(src=f"cellauto", format="lavfi")
#
# .. raw:: html
#
#
#
######################################################################
# Mandelbrot
# ~~~~~~~~~~
# https://ffmpeg.org/ffmpeg-filters.html#cellauto
#
# .. code::
#
# Streamer(src=f"mandelbrot", format="lavfi")
#
# .. raw:: html
#
#
#
######################################################################
# MPlayer Test patterns
# ~~~~~~~~~~~~~~~~~~~~~
# https://ffmpeg.org/ffmpeg-filters.html#mptestsrc
#
# .. code::
#
# Streamer(src=f"mptestsrc", format="lavfi")
#
# .. raw:: html
#
#
#
######################################################################
# John Conway's life game
# ~~~~~~~~~~~~~~~~~~~~~~~
# https://ffmpeg.org/ffmpeg-filters.html#life
#
# .. code::
#
# Streamer(src=f"life", format="lavfi")
#
# .. raw:: html
#
#
#
######################################################################
# Sierpinski carpet/triangle fractal
# ~~~~~~~~~~~~~~~~~~~~~~~~~~~~~~~~~~
# https://ffmpeg.org/ffmpeg-filters.html#sierpinski
#
# .. code::
#
# Streamer(src=f"sierpinski", format="lavfi")
#
# .. raw:: html
#
#
#
######################################################################
# 3. Custom output streams
# ------------------------
#
# When defining an output stream, you can use
# :py:meth:`~torchaudio.prototype.io.Streamer.add_audio_stream` and
# :py:meth:`~torchaudio.prototype.io.Streamer.add_video_stream` methods.
#
# These methods take ``filter_desc`` argument, which is a string
# formatted according to ffmpeg's
# `filter expression
#
######################################################################
# 2.2. Synthetic video examples
# -----------------------------
#
######################################################################
# Cellular automaton
# ~~~~~~~~~~~~~~~~~~
# https://ffmpeg.org/ffmpeg-filters.html#cellauto
#
# .. code::
#
# Streamer(src=f"cellauto", format="lavfi")
#
# .. raw:: html
#
#
#
######################################################################
# Mandelbrot
# ~~~~~~~~~~
# https://ffmpeg.org/ffmpeg-filters.html#cellauto
#
# .. code::
#
# Streamer(src=f"mandelbrot", format="lavfi")
#
# .. raw:: html
#
#
#
######################################################################
# MPlayer Test patterns
# ~~~~~~~~~~~~~~~~~~~~~
# https://ffmpeg.org/ffmpeg-filters.html#mptestsrc
#
# .. code::
#
# Streamer(src=f"mptestsrc", format="lavfi")
#
# .. raw:: html
#
#
#
######################################################################
# John Conway's life game
# ~~~~~~~~~~~~~~~~~~~~~~~
# https://ffmpeg.org/ffmpeg-filters.html#life
#
# .. code::
#
# Streamer(src=f"life", format="lavfi")
#
# .. raw:: html
#
#
#
######################################################################
# Sierpinski carpet/triangle fractal
# ~~~~~~~~~~~~~~~~~~~~~~~~~~~~~~~~~~
# https://ffmpeg.org/ffmpeg-filters.html#sierpinski
#
# .. code::
#
# Streamer(src=f"sierpinski", format="lavfi")
#
# .. raw:: html
#
#
#
######################################################################
# 3. Custom output streams
# ------------------------
#
# When defining an output stream, you can use
# :py:meth:`~torchaudio.prototype.io.Streamer.add_audio_stream` and
# :py:meth:`~torchaudio.prototype.io.Streamer.add_video_stream` methods.
#
# These methods take ``filter_desc`` argument, which is a string
# formatted according to ffmpeg's
# `filter expression